SUPERCHARGE YOUR ONLINE VISIBILITY! CONTACT US AND LET’S ACHIEVE EXCELLENCE TOGETHER!
Having a well-structured XML sitemap is crucial for any website to ensure that search engines can easily crawl and index its pages. An XML sitemap acts as a roadmap, guiding search engine bots to discover and understand the structure of a website efficiently. In this article, we will explore how to create a simple XML sitemap using Python, a popular programming language known for its versatility and ease of use.
XML sitemaps are beneficial for the discovery of URLs by Google. Some online free tools let you create XML sitemaps, but usually have a limitation to 500 URLs or so. On the other hand, other paid tools can assist you to create an extra-large sitemap. Here, Python can play an important role to help you create XML sitemaps for SEO.

The Importance of XML Sitemaps for SEO
In the intricate world of search engine optimization (SEO), every tool and strategy at your disposal can make a significant difference in your website’s performance. One such tool that plays a crucial role in SEO is the XML sitemap. XML sitemaps act as a guide for search engines, helping them navigate and understand your website’s structure and content. In this comprehensive 2000-word blog, we will delve into the importance of XML sitemaps for SEO and how they can boost your website’s visibility and organic traffic.
Understanding XML Sitemaps
Before we explore their importance, let’s start with the basics: what are XML sitemaps, and how do they work? An XML sitemap is a file that lists all the pages on your website, along with essential information about each page. This information typically includes the page’s URL, the date it was last modified, the frequency of updates, and the page’s priority relative to other pages on your site.
Search engines, such as Google, Bing, and Yahoo, use these XML sitemaps as a roadmap to crawl and index your website effectively. While search engines can discover and index web pages on their own, XML sitemaps streamline the process and provide critical information that helps search engines understand your site’s structure.
The role of XML sitemaps in SEO
Now, let’s explore the significant role that XML sitemaps play in search engine optimization:
1. Improved Crawlability
In the vast expanse of the internet, search engines rely on web crawlers, also known as bots or spiders, to traverse the web and index web pages. These crawlers play a pivotal role in the process of ranking and displaying pages in search engine results. XML sitemaps serve as a crucial guide for these crawlers, ensuring that they can efficiently find and access all the significant pages on your website. Here’s why improved crawlability is a fundamental benefit of XML sitemaps:
1. Navigation Efficiency: Search engine crawlers are tasked with navigating an extensive network of websites and pages. Without a clear roadmap, they may struggle to locate all the pages on your website. XML sitemaps provide a structured and organized list of your website’s pages, making it easier for crawlers to find and index them.
2. Preventing Omission: For large websites with substantial content, it’s all too common for certain pages to go unnoticed by search engines. XML sitemaps act as a safety net, reducing the likelihood of crucial pages being omitted from the indexing process. This is particularly valuable for websites with deep content hierarchies or numerous archived pages.
3. Faster Indexing: In the absence of XML sitemaps, crawlers might need more time to discover and index new content or changes to existing pages. XML sitemaps expedite the indexing process, ensuring that recent updates and new pages are promptly identified and included in search engine results.
4. Comprehensive Coverage: Large websites, especially e-commerce platforms, can have a multitude of product pages, categories, and variations. Without an XML sitemap, some of these pages may remain hidden from search engines. The sitemap ensures that all pages, regardless of their depth within the website’s structure, are accessible to crawlers.
5. Enhanced SEO: When search engines can crawl and index all of your website’s pages effectively, it enhances your overall SEO performance. You have a better chance of achieving higher rankings and visibility in search engine results, which, in turn, can attract more organic traffic.
In summary, XML sitemaps are an invaluable tool for enhancing the crawlability of your website. They provide a clear path for search engine crawlers, ensuring that no page is left undiscovered. This is especially critical for large websites with extensive content, where efficient crawlability can significantly impact the website’s visibility and performance in search engine results.
2. Ensuring indexing of all pages
Indexing is a cornerstone of search engine optimization (SEO). If your web pages aren’t indexed by search engines, they essentially remain hidden from potential visitors and users. XML sitemaps play a crucial role in ensuring that all your website’s pages are indexed, and here’s why it’s so important:
1. Visibility in Search Results: The ultimate goal of SEO is to improve your website’s visibility in search engine results. If your pages aren’t indexed, they won’t appear in search results, rendering your SEO efforts futile. XML sitemaps act as a guarantee that your most valuable and relevant pages are indexed, increasing the likelihood of your content being visible to users searching for related keywords.
2. Inclusion of Crucial Content: Not all pages on your website are created equal. Some are more critical than others, such as your homepage, product pages, or informative blog posts. XML sitemaps allow you to prioritize and ensure the indexing of these crucial pages, meaning that the content that matters the most is readily available to your target audience.
3. Preventing Omission: Without XML sitemaps, search engines might overlook certain pages, especially if they are buried deep within your website’s structure. These might include product variations, archived content, or less frequently updated pages. XML sitemaps act as a safety net, reducing the risk of essential content being omitted from indexing.
4. Efficient Updates: When you add new pages or update existing ones, XML sitemaps help in the efficient discovery and indexing of these changes. Without them, it may take longer for search engines to recognize and include these updates in search results.
5. Maximizing Content Exposure: The more pages that are indexed, the broader your website’s exposure in search results. By ensuring that all pages are included, XML sitemaps contribute to the comprehensive representation of your website in search engine databases.
6. Supporting SEO Objectives: SEO aims to attract organic traffic to your website. Without indexing, this traffic remains elusive. XML sitemaps align with your SEO objectives by facilitating the indexing process and enhancing the visibility of your content.
In conclusion, XML sitemaps are a vital component of SEO, ensuring the indexing of all pages on your website. They serve as a guarantee that your most valuable and relevant content is included in search engine results. This maximizes your content’s visibility and supports your broader SEO objectives of attracting organic traffic and engaging with your target audience.
3. Priority and Frequency of Updates
XML sitemaps offer more than just a list of your website’s pages; they also allow you to communicate essential information to search engines regarding the priority and frequency of updates for each page. This information helps search engines understand the relative significance of your pages and how often they should revisit and crawl them for changes. Here’s why setting priorities and frequencies in your XML sitemap is a valuable SEO practice:
1. Page Importance Clarification: Not all pages on your website carry the same level of importance. Some are crucial, such as your homepage or product pages, while others, like archived blog posts, may be less critical. XML sitemaps enable you to indicate the priority of each page, ensuring that search engines recognize which pages hold more weight in terms of content and relevance.
2. Efficient Crawl Scheduling: Search engines allocate resources and time for crawling and indexing websites. By specifying the frequency of updates in your XML sitemap, you help search engines determine how often they should revisit your pages. This optimizes resource allocation and ensures that important pages receive more frequent attention.
3. Spotlight on Vital Content: Pages that are identified as high-priority in your XML sitemap are more likely to be crawled more frequently. This means that your most significant and current content gets more attention from search engine crawlers. It’s an effective way to emphasize your top-performing pages.
4. Timely Updates: If you regularly update specific pages, such as a blog or news section, you can set a higher update frequency in your XML sitemap. This informs search engines that these pages undergo frequent changes and should be crawled more frequently. Timely indexing of fresh content is essential for keeping your website relevant in search results.
5. Enhanced User Experience: Setting priorities and updating frequencies in your XML sitemap indirectly benefits your website’s visitors. When search engines keep your most critical pages up-to-date and readily available in search results, users can access the latest and most relevant information, leading to a better user experience.
6. Strategic SEO: SEO is all about strategy, and XML sitemaps allow you to implement a strategic approach. By indicating page priorities and update frequencies, you can tailor your SEO efforts to focus on the pages that matter most for your business objectives.
In summary, the ability to set priorities and update frequencies in your XML sitemap is a valuable tool for SEO practitioners. It helps in communicating the significance of different pages to search engines and ensures that resources are allocated efficiently. This strategic approach optimizes crawl scheduling by emphasizing vital content and improving the user experience by offering the most relevant information to your audience.
4. Enhanced SEO for Large Websites
Large websites with extensive content pose unique challenges for SEO. Managing and optimizing thousands or even millions of pages can be a daunting task. XML sitemaps play a pivotal role in enhancing the SEO performance of large websites. Here’s why they are indispensable in this context:
1. Preventing Page Omission: Large websites often have a complex structure with numerous subpages, categories, and variations. Without XML sitemaps, some of these pages may remain hidden from search engines, resulting in their omission from the index. XML sitemaps act as a comprehensive guide, ensuring that every page, regardless of its depth within the website’s hierarchy, is accessible to search engine crawlers.
2. Efficient Resource Allocation: Search engines allocate resources, including crawl budget and time, for indexing websites. For large websites, it’s critical to use these resources efficiently. XML sitemaps help search engines understand the website’s structure and content hierarchy. This allows for the allocation of resources to be more targeted, ensuring that important pages receive adequate attention.
3. Facilitating Updates: Large websites typically feature a high volume of content updates and additions. Whether it’s e-commerce platforms adding new products or news websites publishing fresh articles, timely indexing is essential. XML sitemaps expedite the update process by informing search engines of new content. This ensures that the latest additions are promptly indexed and available in search results.
4. Improved User Experience: When search engines can efficiently index a large website’s content, it directly benefits users. Visitors can find a wide range of information and navigate through various sections, enhancing their overall experience. This comprehensive coverage of content is essential for retaining and engaging a diverse audience.
5. Comprehensive SEO: For large websites, SEO is not only about optimizing individual pages, but also about ensuring that the entire website is search engine-friendly. XML sitemaps contribute to the comprehensive SEO of large websites by providing a clear map of the site’s structure and content. This helps search engines index all pages, ultimately leading to improved visibility and search engine rankings.
6. Timely Discoverability: Large websites often have sections that receive frequent updates, such as news or events. XML sitemaps allow webmasters to specify update frequencies for such pages, ensuring that they are crawled and indexed promptly. Timely discoverability is essential for keeping visitors informed about the latest developments.
In conclusion, XML sitemaps are a necessity for large websites seeking to enhance their SEO performance. They prevent page omissions, optimize resource allocation, facilitate content updates, and improve the overall user experience. For large websites with extensive content, XML sitemaps provide the structure and guidance needed to ensure that every page is efficiently indexed, contributing to better search engine visibility and rankings.
5. Faster Indexing
Indexing is a critical step in search engine optimization (SEO), as it determines whether your web pages will be included in search engine results. Traditional methods of relying solely on search engine crawlers to discover and index your pages can be time-consuming, particularly for new content. XML sitemaps provide a solution by expediting the indexing process. Here’s why faster indexing is a key benefit of XML sitemaps:
1. Timely Exposure: When you create new content or update existing pages, you want it to be visible to users as soon as possible. XML sitemaps serve as a direct list of pages that need to be indexed. This means that search engines are informed promptly about new content , increasing the chances of timely exposure in search results.
2. Reduced Latency: In the absence of XML sitemaps, search engines rely on their algorithms and regular crawls to discover new content. This process can introduce latency, meaning there may be a delay between content creation and its appearance in search results. XML sitemaps cut down on this latency by proactively providing a list of pages to be indexed.
3. Effective for Updates: It’s not just new content that benefits from faster indexing; updates to existing pages also get noticed more promptly. Whether you’ve introduced changes to product listings, articles, or other content, XML sitemaps ensure that these modifications are quickly reflected in search results.
4. Competitive Advantage: In highly competitive niches, staying ahead of the competition is essential. Faster indexing gives you a competitive edge by allowing your new content or updates to be seen by users before similar content from competitors.
5. Improved User Engagement: Timely indexing results in better user engagement. When users can find the latest and most relevant information quickly, they are more likely to stay on your website, increasing the average time spent on your pages.
6. SEO Impact: From an SEO perspective, faster indexing means that your optimization efforts start yielding results sooner. As search engines index your pages promptly, your website’s visibility and rankings can improve more rapidly.
In summary, XML sitemaps expedite the indexing process, ensuring that new content and updates are discovered and added to search engine results more rapidly. This not only benefits SEO practitioners but also improves the user experience by providing timely access to the most relevant and current information. Faster indexing is particularly valuable for staying competitive in dynamic online environments.
6. Improved User Experience
XML sitemaps, designed to aid search engines, offer indirect but substantial benefits to your website’s visitors. The connection between XML sitemaps and an improved user experience is an essential aspect of their value. Here’s how these sitemaps enhance the user experience:
1. Access to Fresh and Relevant Content: When search engines can quickly discover and index your content through XML sitemaps, users benefit by having access to the most up-to-date and relevant information when they search. This means they are more likely to find content that directly addresses their needs or interests.
2. Enhanced Navigational Experience: XML sitemaps indirectly contribute to a better navigational experience for users. When users search for specific topics or keywords on your website, the sitemap ensures that the search results are comprehensive, presenting a wide range of relevant pages. This allows users to explore various aspects of a topic or find information that aligns with their interests.
3. Reduced Frustration: Users typically engage more positively with websites that provide efficient search functionality and quick access to the desired content. XML sitemaps reduce the likelihood of users encountering error pages or experiencing frustration due to broken links or outdated information.
4. Longer Time Spent on Your Website: When users can easily find the information they are seeking, they tend to spend more time on your website. This extended dwell time is a positive signal to search engines and can contribute to improved rankings. Additionally, longer time spent on your website allows you to engage users more effectively and potentially convert them into customers or subscribers.
5. Lower Bounce Rates: Bounce rates, which measure the percentage of visitors who leave your site after viewing only one page, can be reduced with the help of XML sitemaps. When users quickly find the content they were looking for, they are less likely to bounce, indicating a positive user experience.
6. Repeat Visits: A website that consistently offers an improved user experience, including easy access to relevant content, is more likely to attract repeat visits. Users who have positive experiences on your site are more inclined to return, whether to consume more content, make a purchase, or engage with your brand.
7. Brand Loyalty: Over time, delivering a consistently improved user experience can lead to brand loyalty. Users who find value in your website are more likely to become loyal customers, subscribers, or followers.
In conclusion, while XML sitemaps are primarily created to assist search engines, they indirectly enhance the user experience on your website. By facilitating quick access to fresh and relevant content, reducing frustration, and extending the time users spend on your site, XML sitemaps contribute to higher user engagement, lower bounce rates, and ultimately, brand loyalty. An improved user experience is not only beneficial for your audience but also supports your SEO objectives.

Creating an Effective XML Sitemap
Now that we understand the importance of XML sitemaps in SEO, it’s crucial to know how to create and optimize one for your website. Here are the essential steps to ensure your XML sitemap is effective:
1. Use an XML sitemap generator:
- Several online tools and plugins are available to simplify the process of generating XML sitemaps. These tools are user-friendly and don’t require manual coding expertise.
- XML sitemap generators typically crawl your website to create a comprehensive list of pages and organize them into a well-structured XML file.
- The generated XML sitemap file should adhere to the XML protocol, ensuring that it’s machine-readable and follows the required format.
2. Include all the important pages:
- Your XML sitemap should encompass all significant pages on your website. This includes core pages like the homepage, about us, contact, product or service pages, blog posts, category pages, and any other content that you want search engines to index.
- Remember that the goal is to create a map of your entire website’s content, ensuring nothing essential is left out. Omitting critical pages can affect your website’s visibility in search results.
3. Prioritize Pages:
- Prioritizing pages within your XML sitemap involves assigning priority levels to each page. This is done using a numeric value between 0.0 and 1.0.
- Priority levels help convey the relative importance of pages to search engines. Typically, core pages like the homepage or product pages receive higher priority values, while less critical pages may have lower values.
- While search engines may not strictly adhere to these priority values, they provide guidance on page importance.
4. Set Update Frequencies:
- Indicating how often each page is updated is essential for informing search engines about the content’s freshness. This can be set to various intervals, such as daily, weekly, monthly, or never, depending on the nature of the content.
- Setting update frequencies ensures that search engines know when to revisit and re-crawl specific pages for changes. Content that is frequently updated benefits from more frequent indexing.
5. Submit to Search Engines:
- After creating your XML sitemap, it’s crucial to submit it to major search engines like Google, Bing, and Yahoo. Each search engine provides webmaster tools that allow you to submit your sitemap.
- The submission process involves verifying ownership of your website and uploading the sitemap file to the respective search engine’s webmaster tool.
- Once submitted, search engines become aware of your sitemap and use it as a reference for crawling and indexing your site.
6. Keep It Updated:
- Maintaining an up-to-date XML sitemap is essential to reflect changes on your website. When you add new pages, remove outdated content, or modify existing pages, it’s important to update your sitemap accordingly.
- Regularly updating and refreshing your sitemap ensures that search engines are aware of the latest changes and can promptly index new or updated content.
- After making updates to your sitemap, consider resubmitting it to search engines to expedite the indexing process for the changes.
Creating and managing an XML sitemap involves using user-friendly tools to generate a comprehensive list of your website’s pages, prioritizing pages to indicate their importance, specifying update frequencies to convey content freshness, submitting the sitemap to search engines for indexing, and keeping the sitemap regularly updated to reflect changes on your website. A well-maintained XML sitemap is a valuable tool for optimizing your website’s visibility in search engine results.
XML sitemaps play a vital role in search engine optimization (SEO). By providing search engines with a clear map of your website’s content, you increase the chances of all your important pages getting indexed. This, in turn, can lead to improved visibility in search engine results and potentially higher organic traffic.
In this blog post, we will show you how to create a sitemap.xml file using Python with each and every step mentioned.
For prerequisites, you can refer to this blog steps for implementation step by step.
Once you are done with this, then head over to the Anaconda console, to run the command as shown below:
Code 1: pip install oauth2client httplib2
Code 2: pip install pandas
Here we need to install some library files, as shown below:
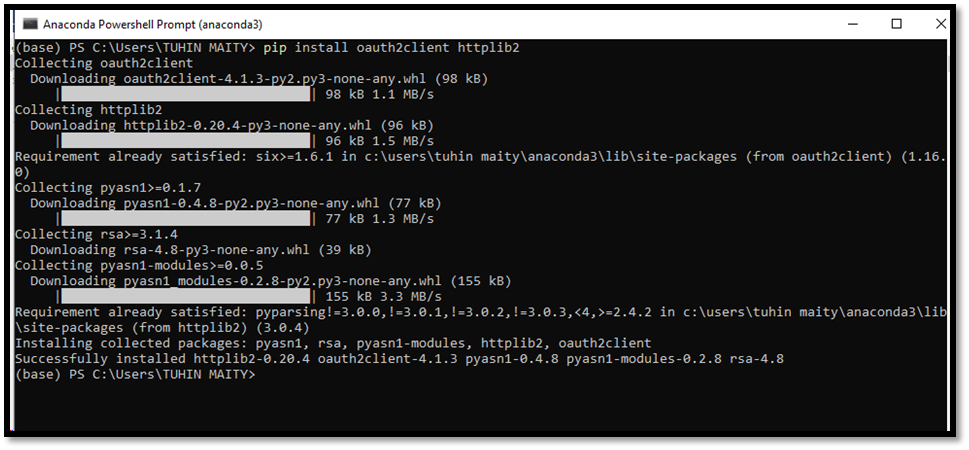
Code 1 initialization done
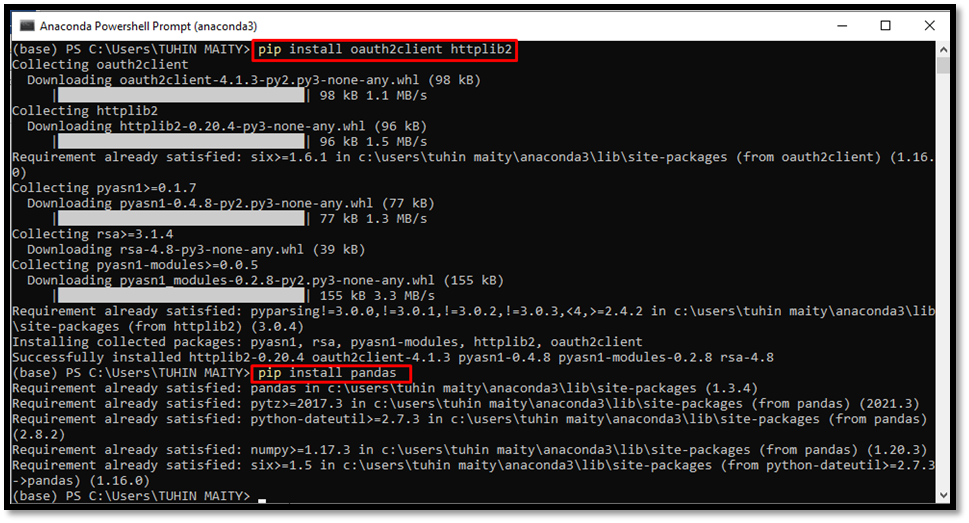
Code 2 initialization done
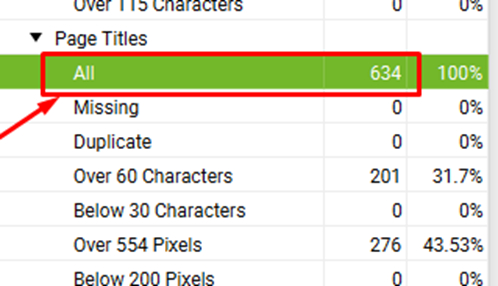
Now just check the current index status for the site you are expecting to index on Google.
Current discovered URLs on Google: 634
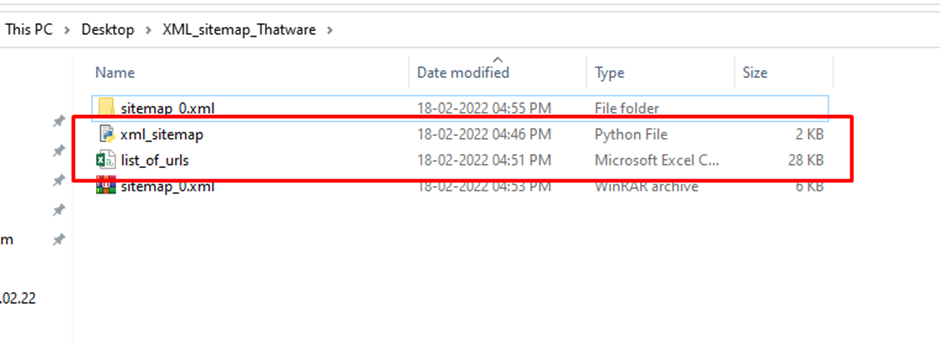
And based on these searches, make a comprehensive list of URLs that you want to index on Google and save it in a CSV file (data.csv)
Then create a folder consisting of 2 files, one is data.csv (the list of URLs), another one is xml_sitemap.py code snippet file.
Once you are ready with all the files then we need to finally run the indexing script through the terminal as shown here:
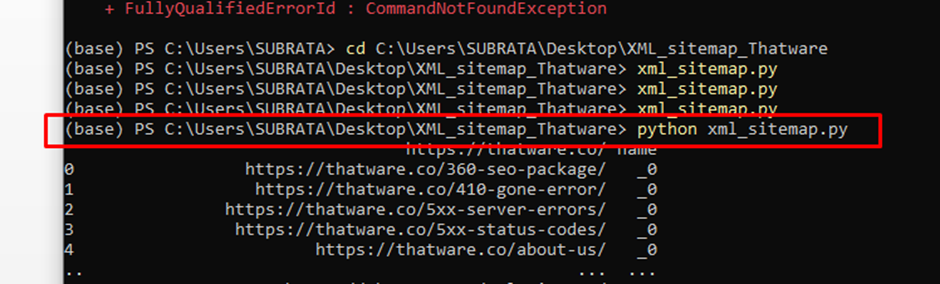
Let’s run the code of xml_sitemap.py.
We re-run the Anaconda Console and change the path of the respective directory by putting the below syntax as shown in the screenshot below:

After changing the path we run the following code as below:
Code to execute: python xml_sitemap.py
Once you run the code Google will get the indexing request for the specified URLs with timestamps as shown in the above screenshot.
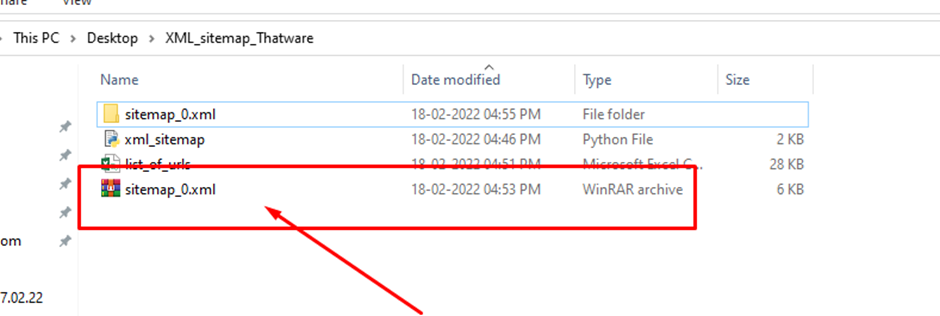
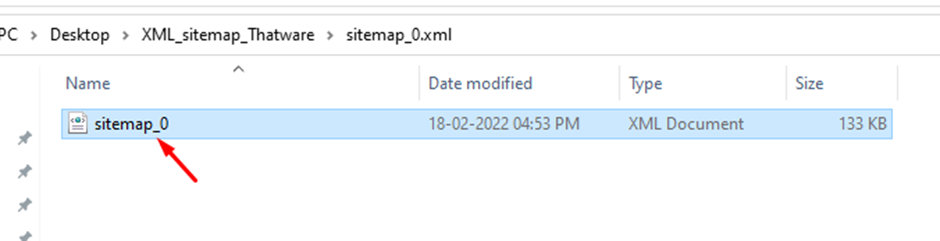
After executing the code the sitemap_0.xml zip file is created.
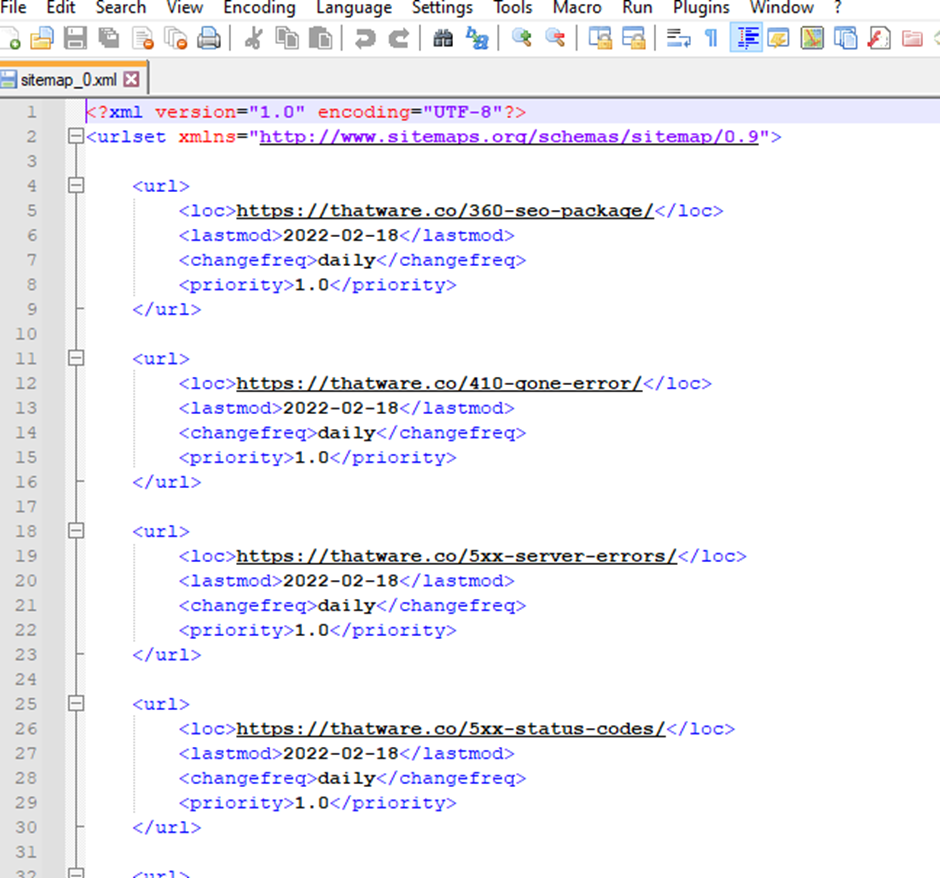
The Sitemap file is properly included on all the pages.
Best Practices for XML Sitemaps
- Keep the sitemap up to date with the latest changes to your website.
- Ensure that all URLs listed in the sitemap are valid and accessible.
- Limit the number of URLs in a single sitemap to 50,000, and create multiple sitemaps if needed.
- Use a consistent naming convention for sitemap files, such as “sitemap.xml.”
- Monitor sitemap errors and fix them promptly.
FAQs
1. Can I create a sitemap for a website built with a different programming language?
Yes, you can create a sitemap for any website, regardless of the programming language used. Sitemaps are based on the XML protocol, which is language-agnostic. While some programming languages provide convenient tools and libraries for generating sitemaps, the fundamental principles of creating a sitemap remain the same. You need to list the URLs of your website’s pages, set their priority and update frequency if desired, and structure the sitemap according to XML guidelines.
2. Is it necessary to submit the sitemap to search engines?
While it’s not mandatory to submit your sitemap to search engines, doing so can provide several benefits. Submitting your sitemap through the webmaster tools provided by major search engines, such as Google Search Console, Bing Webmaster Tools, or others, expedites the indexing process. Search engines use the sitemap as a reference to discover and crawl your web pages more efficiently. This can lead to faster inclusion of your pages in search results, improving your website’s discoverability.
3. Are there any limitations to XML sitemaps?
Yes, search engines impose certain limitations on XML sitemaps. These limitations typically include a maximum number of URLs allowed in a single sitemap and a maximum file size. For example, Google has specific guidelines for sitemaps, including a maximum of 50,000 URLs per sitemap and a maximum uncompressed file size of 50 MB. It’s essential to adhere to these guidelines to ensure that search engines can process your sitemaps effectively.
4. Can I create a sitemap for a large website with thousands of pages?
Yes, you can create a sitemap for a large website with thousands of pages. For large websites, it’s advisable to consider breaking the sitemap into smaller, manageable sitemaps. These smaller sitemaps can then be organized into a sitemap index file. The sitemap index file references all the individual sitemaps, making it easier for search engines to navigate and index the content. This approach ensures that even extensive websites can have well-structured sitemaps.
5. How often should I update my sitemap?
It’s best to update your sitemap whenever significant changes occur on your website. This includes actions like adding new pages, removing outdated content, or modifying existing pages. Regularly updating your sitemap ensures that search engines are aware of the latest changes and can promptly index new or updated content. Timely updates help maintain the accuracy and relevance of your sitemap, which in turn supports effective SEO and content discoverability.
Benefits of simple XML sitemap creation through Python in SEO
Creating a sitemap in SEO with the help of Python can significantly positively impact SEO. XML sitemap is the roadmap for the search engines, it can navigate and index your website accurately. As a result, it ensures that all the pages are discovered and ranked properly improving your website in search engine results.
Python is very simple and hence it is the best choice for generating sitemaps. The language’s readability and libraries process quick sitemap creation, even if you have less programming experience. Automated sitemap generation reduces the human risk error, ensuring that all URLs are included.
Through XML sitemap, you can highlight the important pages and update the frequencies, signalling the search engines to prioritise these pages. It leads to faster website indexing and better ranking for updated content. As a result, it is effective in maintaining a competitive online presence.
You can simply process with effective website indexing, boost the website searchability, and streamline the maintenance process.
CONCLUSION
Creating a simple XML sitemap through Python is a powerful way to enhance the visibility of your website on search engines. By organizing and presenting your website’s URLs and metadata in a structured manner, you enable search engine bots to navigate and index your site effectively. Remember to keep your sitemap up-to-date and follow best practices for optimal results.
Sitemaps are versatile tools that can be created for websites in any programming language. While not mandatory, submitting your sitemap to search engines can significantly improve the discoverability of your content. Adhering to search engine limitations is essential to ensure effective sitemap processing. For large websites, breaking sitemaps into smaller ones with a sitemap index file is a recommended approach. Finally, updating your sitemap whenever significant changes occur ensures that search engines accurately reflect your website’s content in search results.