GET A FREE CUSTOMIZED SEO AUDIT & DIGITAL MARKETING STRATEGY FOR YOUR BUSINESS

I. Introduction
When it comes to managing a website’s SEO and ensuring a seamless user experience, addressing issues related to redirects is crucial. Redirect chains, a common but often overlooked problem, can negatively impact your site’s performance and search engine ranking. In this article, we will delve into the world of redirect chains, exploring what they are, why they matter, and how to effectively detect and resolve them using the powerful tool, Screaming Frog SEO Spider.
A. Explanation of Redirect Chains
A redirect chain occurs when multiple redirections are in place between the original URL and the final destination. This means that when a user or search engine crawler attempts to access a specific page on your website, they are redirected multiple times before reaching the intended content. These chains can result from various scenarios, such as outdated links, site migrations, or content reorganization.
For instance, if you have a URL “example.com/pageA” that redirects to “example.com/pageB,” which, in turn, redirects to “example.com/pageC,” you have a redirect chain. These chains can be complex, involving numerous URLs, and they can hinder your website’s performance in several ways.
B. Importance of Detecting Redirect Chains
Detecting and addressing redirect chains is vital for several reasons:
User Experience: Redirect chains slow down the loading of web pages, leading to a poor user experience. Users are less patient in today’s fast-paced digital world, and a delay of a few seconds can result in higher bounce rates and decreased user satisfaction.
SEO Impact: Search engines, such as Google, consider website speed and user experience as ranking factors. Redirect chains can negatively affect your site’s search engine ranking, making it harder for potential visitors to find your content.
Crawl Budget: Search engine crawlers allocate a specific budget for each website, determining how many pages they will crawl during a session. Redirect chains consume this budget quickly, limiting the number of pages that are effectively indexed. As a result, important pages may be left out.
Link Juice Dilution: Redirect chains can dilute the authority passed through backlinks, as each redirection may slightly decrease the link equity. In the long run, this can affect your site’s overall SEO performance.
C. Overview of Using Screaming Frog for the Task
Screaming Frog SEO Spider is a versatile and user-friendly website crawling tool that has gained popularity among SEO professionals. It allows you to perform comprehensive website audits, including the detection of redirect chains. The tool efficiently crawls your website, gathers data, and provides valuable insights into your site’s structure and performance.
In this article, we will explore how to utilize Screaming Frog SEO Spider to identify and address redirect chains. This tool simplifies the process by providing a clear overview of your website’s redirects, making it easier to pinpoint issues and take corrective actions.
By the end of this article, you will have a better understanding of redirect chains, their implications, and the step-by-step process of using Screaming Frog to detect and resolve them. This knowledge will empower you to improve your website’s performance, enhance the user experience, and maintain a favorable position in search engine results.
II. Understanding Redirects
Understanding redirects is a fundamental aspect of maintaining a well-structured and user-friendly website while ensuring positive SEO outcomes. In this section, we’ll explore the various types of redirects, why redirect chains occur, and the negative impact they can have on your website’s SEO performance.
A. Types of Redirects
Redirects are HTTP status codes that instruct web browsers and search engine crawlers to move from one URL to another. They serve as a crucial tool for website maintenance, content organization, and user experience improvement. There are several types of redirects, each serving specific purposes:
1. 301 Redirect (Permanent Redirect): A 301 redirect is used when a web page or resource has been permanently moved to a new location. It tells search engines that the old URL should be replaced with the new one in their index. This is the most common type of redirect used for SEO, as it passes the majority of link equity to the new URL.
2. 302 Redirect (Temporary Redirect): A 302 redirect indicates a temporary move or change. It is often used when a page is under maintenance or when a temporary change is needed. Unlike the 301, a 302 redirect does not pass link equity, and search engines will continue to index the original URL.
3. 303 Redirect (See Other): A 303 redirect is often used in response to a POST request. It instructs the browser to perform a GET request to the specified URL. It doesn’t pass link equity and is less commonly used for SEO purposes.
4. 307 Redirect (Temporary Redirect): Similar to the 302 redirect, the 307 redirect signifies a temporary move. It instructs the browser to maintain the method used for the original request when reaching the new URL. Like the 302 redirect, it does not pass link equity.
5. Meta Refresh: While not an HTTP status code, the meta refresh is a type of redirect that uses a meta tag in the HTML of a page. It instructs the browser to automatically load a new page after a specified time. It’s not ideal for SEO as it may not be as search engine-friendly as HTTP redirects.
6. Canonical Tags: Although not technically a redirect, canonical tags are used to specify the preferred version of a URL when duplicate content issues exist. This helps search engines understand which URL to prioritize in their index.
B. Why Redirect Chains Occur
Redirect chains typically occur due to a variety of reasons, often resulting from the evolution and maintenance of a website. Common factors contributing to redirect chains include:
1. Website Restructuring: As websites evolve, content is reorganized, and URLs may change. When these changes aren’t managed properly, they can lead to redirect chains as older URLs are redirected to intermediate or new URLs, creating multiple hops.
2. Content Migration: When migrating content from one platform or location to another, redirect chains can emerge if the redirects from the old to the new URLs are not efficiently managed.
3. URL Changes: Renaming or restructuring URLs can trigger redirect chains if older URLs are not properly redirected to the new ones.
4. Multiple Redirect Rules: Over time, websites may accumulate multiple redirect rules, leading to complex chains. If not reviewed regularly, these chains can grow and become problematic.
5. Ignored or Forgotten Redirects: Sometimes, certain redirects are overlooked or forgotten during website maintenance. Ignored or obsolete redirects can contribute to chain formation.
C. Negative Impact on SEO
Redirect chains can have a significant negative impact on your website’s SEO performance in several ways:
1. Slower Page Loading: Each redirect in a chain adds extra loading time, slowing down your web pages. Sluggish load times can lead to higher bounce rates as users are less patient and expect websites to load quickly. Slow-loading pages can also negatively affect search engine rankings, as site speed is a ranking factor.
2. Crawl Budget Depletion: Search engines allocate a limited crawl budget to each website during their indexing process. Redirect chains can quickly deplete this budget, causing search engine crawlers to miss other important pages. As a result, valuable content may not be properly indexed and ranked.
3. Link Equity Dilution: Link equity, often referred to as “link juice,” is the SEO value passed from one page to another through links. Each redirect in a chain can slightly dilute this link equity, potentially impacting the ability of linked pages to rank well in search engine results.
4. Indexing Issues: Search engines may not follow and index every link in a chain. They may stop following the chain after a certain number of hops, missing the final destination. This can lead to incomplete indexing and decreased visibility of important pages.
5. Poor User Experience: Redirect chains can create a frustrating experience for users. When users encounter excessive redirects, they may abandon your website in favor of a more user-friendly one. This can result in higher bounce rates and decreased engagement.
In summary, redirect chains are a common issue that can have detrimental effects on your website’s SEO, user experience, and crawl efficiency. Recognizing and addressing these chains is essential for maintaining a high-performing website and ensuring that your content ranks well in search engine results. In the next sections, we will explore how to detect and resolve redirect chains, with a focus on using Screaming Frog SEO Spider as a valuable tool in this process.

III. Screaming Frog SEO Spider
Screaming Frog SEO Spider is a comprehensive website crawling tool that has become a staple in the toolkit of SEO professionals. In this section, we will provide a brief introduction to Screaming Frog, highlight its key features for SEO analysis, and discuss why Screaming Frog is an invaluable tool for detecting and managing redirect chains.
A. Brief Introduction to Screaming Frog
Screaming Frog SEO Spider is a powerful and versatile web crawling software that allows website owners, SEO experts, and digital marketers to analyze and audit websites with remarkable precision. Launched in 2010, it has since become one of the most trusted and widely used SEO tools in the industry.
The tool is designed to mimic the behavior of search engine crawlers by exploring websites, collecting data, and providing insights into various aspects of on-page SEO. Its functionality extends beyond basic crawling and includes features for analyzing links, meta-data, page structure, and much more.
The name “Screaming Frog” itself is intriguing and memorable, but it’s the tool’s ability to crawl websites with remarkable speed and depth that has earned it a stellar reputation among SEO professionals. It’s available for both Windows and macOS, offering a user-friendly interface that makes it accessible to SEO practitioners of all levels.
B. Key Features for SEO Analysis
Screaming Frog SEO Spider boasts an array of features that are specifically tailored to conduct SEO analysis effectively. Some of the key features include:
1. Website Crawling: The tool efficiently crawls your website, exploring every nook and cranny to gather a wealth of data. This data includes details about individual pages, URLs, response codes, and much more. The comprehensive crawl ensures that no part of your website is left unexamined.
2. SEO Audit: Screaming Frog’s SEO audit feature inspects your website for on-page issues that can impact your search engine ranking. This includes checks for missing or duplicate title tags, meta descriptions, header tags, and other vital on-page elements.
3. Link Analysis: The tool offers an in-depth analysis of your website’s internal and external links. It helps you identify broken links, redirect chains, and other issues that can affect user experience and SEO.
4. Canonicalization: Screaming Frog helps you identify canonicalization issues, ensuring that search engines understand your preferred version of a page when dealing with duplicate content.
5. XML Sitemap Generation: The tool can generate XML sitemaps to help search engines better understand your website’s structure and the importance of individual pages.
6. Hreflang Auditing: For international websites, Screaming Frog can identify hreflang tags, which are crucial for indicating language and regional targeting.
7. Data Export: You can export the gathered data in various formats, making it easy to share and analyze the information.
8. Custom Extraction: This feature allows you to extract specific data from web pages. It’s handy for collecting custom data, such as product prices or specific keywords.
C. Why Screaming Frog Is Useful for Detecting Redirect Chains
Detecting and managing redirect chains is a critical SEO task, and Screaming Frog SEO Spider is an invaluable tool for this purpose. Here’s why Screaming Frog is exceptionally useful for identifying and resolving redirect chains:
1. Crawl Depth: Screaming Frog conducts a deep and thorough website crawl, exploring every URL and link. This ensures that no redirect chain goes unnoticed, even in larger websites with complex structures.
2. Redirect Reporting: The tool provides clear and detailed reports on redirects. You can easily identify the start and end points of any redirect chain, helping you pinpoint issues and take corrective actions.
3. Response Codes: Screaming Frog highlights response codes, making it easy to identify where redirects are occurring and whether they are functioning correctly.
4. Visualization: The visualization feature in Screaming Frog displays the entire crawl in a graphical format, allowing you to visually identify the paths of redirect chains and other issues.
5. Data Export: The ability to export data from Screaming Frog means you can share findings with your team, making it easier to collaborate on resolving redirect chain problems.
6. Regular Auditing: With Screaming Frog, you can perform regular website audits, ensuring that any new redirect chains that may emerge are promptly detected and addressed.
Screaming Frog SEO Spider is an exceptional tool for SEO analysis, and its capabilities are particularly beneficial for detecting and managing redirect chains. Its comprehensive website crawling, detailed reporting, and visualization features make it an essential asset for SEO professionals looking to maintain optimal website performance and user experience. In the following sections, we will delve into the practical aspects of using Screaming Frog to identify and address redirect chains effectively.
IV. Setting Up Screaming Frog
Screaming Frog SEO Spider is a robust tool for website analysis, and before you can use it effectively to detect and manage redirect chains, you need to set it up correctly. In this section, we’ll walk you through the essential steps of setting up Screaming Frog, including downloading and installing the software, configuring it for a crawl, and the initial setup steps you should follow.
A. Download and Installation
- Download the Software: The first step in setting up Screaming Frog SEO Spider is to download the software. You can obtain the installer from the official Screaming Frog website (https://www.screamingfrog.co.uk/seo-spider/).
- Choose Your Platform: Screaming Frog is available for both Windows and macOS. Select the version that corresponds to your operating system.
- Installation: Once the download is complete, run the installer. The installation process is straightforward and similar to installing any other software on your computer. Follow the on-screen instructions, and the software will be installed in a matter of minutes.
B. Configuration for Crawl
Before initiating a crawl, it’s essential to configure Screaming Frog to meet your specific requirements. These settings can significantly impact the accuracy and scope of your crawl:
Crawl Mode: Under the “Configuration” menu, you can choose the “Crawl” tab to access various crawl settings. Here, you can select your preferred crawl mode. The two main options are “Spider” and “List.” The “Spider” mode crawls a website as search engines would, following links and discovering pages dynamically. The “List” mode allows you to input a list of specific URLs for crawling. For most SEO analysis, the “Spider” mode is the recommended choice.
Configuration: The “Configuration” tab also provides options for customizing your crawl. Here, you can choose to follow or ignore specific protocols (HTTP, HTTPS, FTP, etc.), designate the user-agent string, and set the user-agent rendering mode. You can also configure the maximum number of pages to crawl, which is useful for controlling the depth and scope of the crawl.
URL List: If you’re using the “List” mode for a targeted crawl, you can import your list of URLs directly. This is especially handy for focused audits or when you want to crawl specific pages without exploring the entire website.
C. Initial Setup Steps
Once you’ve installed Screaming Frog and configured the crawl settings, there are several initial setup steps you should follow to ensure your crawl effectively identifies and reports on redirect chains:
- Enter Your Website URL: Start by entering the URL of the website you want to crawl. This can be done in the “Enter URL to Spider” box, which is typically located at the top of the software’s interface.
- Crawl Scope: Determine the scope of your crawl. You can choose to crawl the entire website or specific sections, directories, or subdomains. Consider the goals of your audit when deciding on the crawl scope.
- Crawl Start: Once you’ve defined your crawl scope and entered the URL, click “Start” to initiate the crawl. Screaming Frog will begin exploring the website and gathering data.
- Review Initial Results: As the crawl progresses, you can review the initial results in real-time. The software provides a wealth of information, including response codes, URL structures, redirects, and more. Pay particular attention to the “Internal” tab, which contains information on internal links and redirects.
- Analyze Redirects: To focus specifically on redirect chains, navigate to the “Response Codes” tab. Here, you can filter the results to show only pages with specific response codes, such as 301 (permanent redirect) or 302 (temporary redirect). This will help you identify URLs involved in redirect chains.
- Export Data: Consider exporting the crawl data for further analysis or to share with your team. The “Export” option is located under the “Bulk Export” menu. You can choose from various file formats, including CSV and Excel, to suit your needs.
- Custom Extraction: For more advanced users, Screaming Frog allows custom extraction of specific data elements from web pages. This feature can be particularly useful for gathering specific information relevant to your analysis.
- Regular Audits: Lastly, it’s important to schedule regular audits and crawls with Screaming Frog. Redirect chains can develop over time as websites evolve, so conducting routine checks ensures that issues are detected and addressed promptly.
Setting up Screaming Frog is a crucial step in the process of using the tool to detect and manage redirect chains effectively. By following the steps outlined above, you can configure the software to meet your specific needs, initiate a crawl, and begin the process of identifying and resolving redirect chain issues on your website. In the next section, we will delve into the practical steps of analyzing redirect chains using Screaming Frog’s data and reports.
Step 1: Start a new crawl
Open Screaming Frog and enter the website URL you want to crawl. Click the “Start” button to begin the crawl. To kick off your journey in utilizing Screaming Frog SEO Spider to detect and manage redirect chains, the initial step is to launch a new crawl. This straightforward process is pivotal in unearthing issues within your website’s redirect structure.
- Launch Screaming Frog: After you’ve successfully installed and opened Screaming Frog SEO Spider on your computer, you’ll be greeted with its user-friendly interface.
- Enter the Website URL: In the top-left corner, locate the “Enter URL to Spider” text box. Here, you will input the URL of the website you intend to crawl. Ensure that you enter the root domain or specific subdirectory, depending on the scope of your analysis.
- Click “Start”: Once the website URL is entered, click the “Start” button. This action initiates the crawl process. Screaming Frog will begin meticulously exploring the website, page by page, URL by URL, collecting a wealth of data and insights along the way.
- Monitor Progress: As the crawl progresses, the software will provide real-time updates on the number of pages crawled, response codes encountered, and the various elements analyzed. This real-time monitoring allows you to gauge the crawl’s progress and observe any potential issues as they emerge.
- Review Initial Results: While the crawl is underway, you can already access the initial results, giving you a glimpse of your website’s SEO health. Pay close attention to response codes, URL structures, and, most notably for this guide, any redirect chains that may become evident.
By commencing your crawl in Screaming Frog, you’re embarking on a journey to thoroughly analyze your website’s redirect structures and diagnose any redirect chain issues. This initial step is pivotal in the redirection issue identification process, setting the stage for further investigation and remediation in the subsequent steps of our guide.
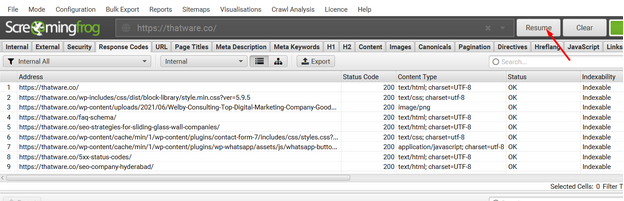
Step 2: Wait for the crawl to finish
Depending on the size of the website, the crawl may take a few minutes or longer to complete. Wait for the crawl to finish before proceeding to the next step. After initiating a crawl in Screaming Frog by entering the website URL and clicking the “Start” button, your next crucial task is to exercise patience and allow the software to complete its comprehensive examination of your website. The duration of the crawl process can vary significantly depending on the size and complexity of the website. Here are some essential considerations and tips to keep in mind during this waiting period:
- Crawl Duration: The time required for the crawl to finish can range from just a few minutes for small websites to several hours for large, intricate websites with numerous pages and complex structures. It’s essential to be aware of this variability, as it enables you to manage your expectations regarding the crawl’s duration.
- Complexity Matters: Websites with intricate structures, deep navigation, and a wealth of content tend to have longer crawl times. Moreover, websites with advanced functionalities, such as e-commerce platforms, databases, or multimedia content, may require additional time for thorough analysis.
- Progress Monitoring: While waiting, it’s a good practice to keep an eye on the progress of the crawl within the Screaming Frog interface. The software provides real-time updates on the number of pages crawled, response codes, and other data points. This monitoring allows you to gauge the crawl’s advancement and identify potential anomalies or issues as they arise.
- Crawl Efficiency: To ensure the efficiency of the crawl, you can configure certain settings in Screaming Frog before initiating the crawl. These settings may include specifying the maximum number of pages to crawl, adjusting crawl speed, and defining the scope of the crawl. Tailoring these settings to your specific analysis goals can expedite the process.
- Routine Auditing: In practice, it’s advisable to schedule routine website audits and crawls to proactively monitor your website’s health. Regular checks ensure that any newly emerged redirect chain issues are promptly identified and addressed.
By allowing the crawl to run its course, you are facilitating a thorough examination of your website’s structure, content, and potential redirect chains. This critical step sets the foundation for the subsequent phases of your journey with Screaming Frog, where you will analyze and address the detected redirect chain issues effectively. Stay patient and use this time to prepare for the valuable insights that Screaming Frog will provide in the upcoming stages of your website optimization process.
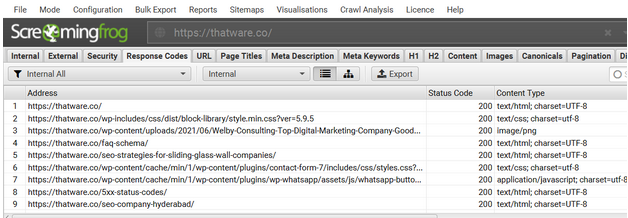
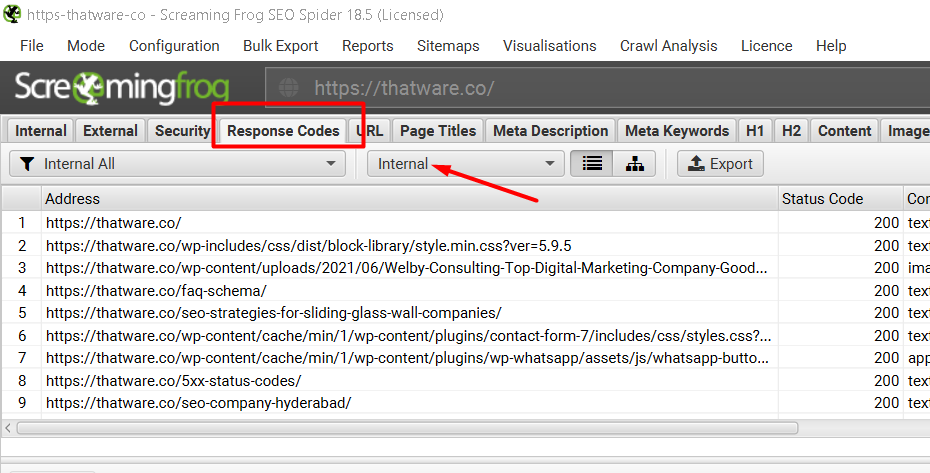
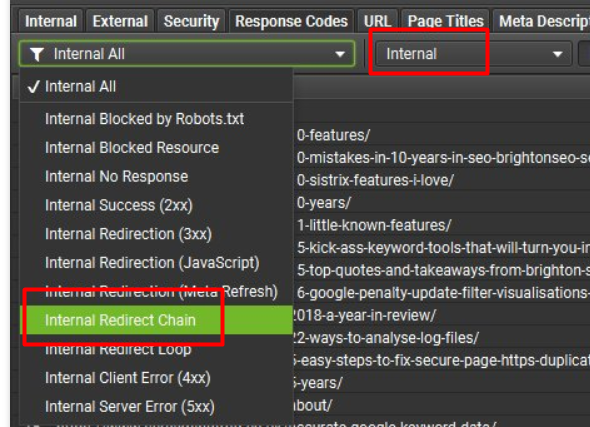
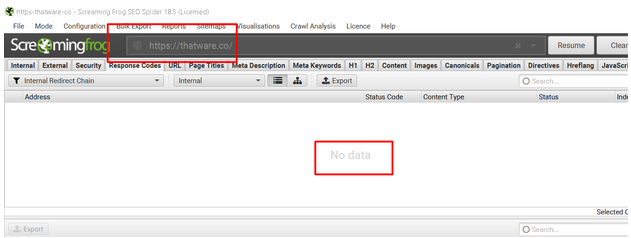
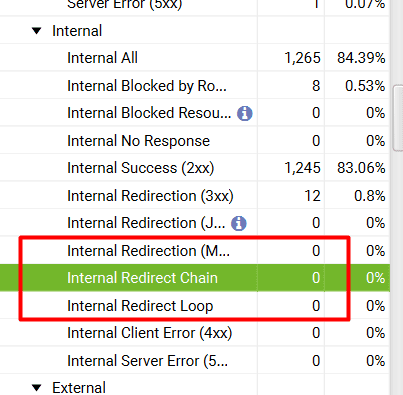
Step 3: Review the response codes
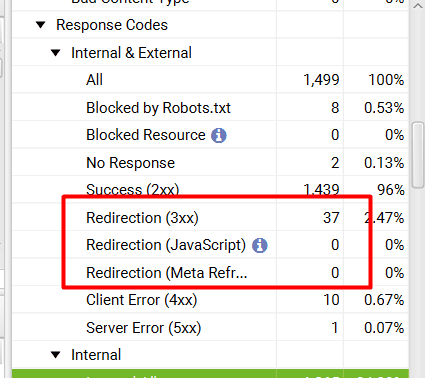
Once the crawl is complete, click on the “Response Codes” tab to view the response codes for each URL. Look for URLs with a 3xx status code, such as 301, 302, or 307. These status codes indicate that the URL has been redirected. After the Screaming Frog crawl is complete, it’s time to delve into the results and uncover the crucial information regarding response codes. To do this, navigate to the “Response Codes” tab within the software. Here, you will find a comprehensive list of response codes for each URL that was crawled. Pay particular attention to URLs displaying 3xx status codes, such as the common 301 (Permanent Redirect), 302 (Temporary Redirect), or 307 (Temporary Redirect) responses.
The 3xx status codes indicate that the URL has been redirected. This is a pivotal step in identifying potential redirect chains. As you review these URLs, you will be able to pinpoint the starting point of a redirect chain, and from there, proceed to trace the path of the chain through various URLs. This detailed examination will lay the foundation for your subsequent actions in identifying, analyzing, and resolving redirect chain issues on your website.
Step 4: Identify URLs with redirect chains
Click on a URL with a 3xx status code to view its details. In the URL details window, look for the “Redirect Chain” section. This section will show you all of the URLs that the original URL has been redirected through. If there are multiple URLs in the redirect chain, this indicates that there is a redirect chain issue that needs to be fixed. To uncover and address redirect chain issues effectively, the next step is to click on a URL displaying a 3xx status code in the Screaming Frog interface. This action will allow you to access the URL’s details for a comprehensive examination.
Within the URL details window, focus your attention on the “Redirect Chain” section. This section is pivotal for your investigation, as it provides a clear list of all the URLs that the original URL has been redirected through. When you encounter multiple URLs within this section, it signifies the existence of a redirect chain issue that necessitates immediate attention and resolution.
By identifying URLs with redirect chains through this meticulous inspection process, you are taking a significant stride toward optimizing your website’s structure and user experience, ultimately contributing to improved SEO performance and higher user satisfaction.
Step 5: Fix redirect chain issues
To fix redirect chain issues, you’ll need to identify the original source of the redirect and update it to point directly to the final destination URL. This will eliminate the need for any intermediate redirects. Once you’ve made the necessary changes, run another crawl to confirm that the redirect chain issue has been resolved. Now that you’ve successfully identified URLs with redirect chains, the next crucial task is to address and rectify these issues. To do this, follow these steps:
- Identify the Original Source: Your first task is to pinpoint the original source of the redirect chain. This is typically the URL that initially triggers the redirection process.
- Direct to Final Destination: Once you’ve identified the original source, update it to point directly to the final destination URL, eliminating any intermediate redirects. This streamlining process simplifies the user journey and reduces the risk of performance bottlenecks.
- Confirm the Fix: After making the necessary changes, it’s essential to verify that the redirect chain issue has been effectively resolved. To do this, run another crawl using Screaming Frog. This verification process ensures that the modifications you’ve implemented are working as intended and that the redirect chain no longer exists.
By diligently following these steps, you are taking proactive measures to enhance the user experience and improve the SEO performance of your website. Eliminating redirect chain issues not only streamlines navigation but also positively impacts search engine rankings, helping your website achieve higher visibility and user satisfaction.
Step 6: Generate a report
To generate a report on redirect chains, click on the “Reports” tab in Screaming Frog. Click the “Create New Report” button and select “Redirect Chains” as the report type. Choose the options you want to include in the report, such as the number of redirect chains and the URLs involved. Click the “Create” button to generate the report. Creating a comprehensive report on redirect chains is a vital aspect of your effort to manage and optimize these redirects effectively. To generate such a report using Screaming Frog, follow these steps:
- Access the Reports Tab: In the Screaming Frog interface, click on the “Reports” tab. This tab is your gateway to generating various types of reports related to your website’s crawl data.
- Create a New Report: Within the Reports tab, locate and click on the “Create New Report” button. This initiates the process of configuring and generating a new report.
- Select “Redirect Chains” as the Report Type: When prompted to choose the report type, select “Redirect Chains.” This selection is pivotal in focusing the report specifically on your redirect chain issues.
- Customize Report Options: Customize the report by selecting the options you want to include. This can encompass details such as the number of redirect chains identified, the URLs involved in each chain, and any other pertinent information you wish to have in the report.
- Generate the Report: After specifying your preferred report options, click the “Create” button. Screaming Frog will then generate the report based on the data collected during the crawl.
The generated report offers a comprehensive overview of your website’s redirect chains, providing essential insights and data to facilitate further analysis and decision-making. This report can be instrumental in sharing findings with your team or superiors, tracking progress over time, and serving as a reference point for your ongoing efforts to enhance your website’s performance and user experience.
Step 7: Review the report
Once the report has been generated, review it to identify any remaining redirect chain issues. Use the information in the report to make the necessary changes to eliminate redirect chains and improve your website’s SEO performance.
Impact of Redirect Chains on Mobile SEO
Redirect chains can have an even more pronounced negative effect on mobile SEO compared to desktop. Mobile users typically rely on slower cellular networks, making them more sensitive to delays caused by multiple redirects. Each additional redirect in a chain increases page load time, which can frustrate users and lead to higher bounce rates. Since Google uses mobile-first indexing, slow-loading pages on mobile devices can directly impact your search rankings. Furthermore, mobile crawlers may have stricter timeouts, causing them to abandon long redirect chains before reaching the final destination. This can result in important pages not being indexed or ranked properly. To ensure optimal mobile SEO performance, it’s crucial to minimize redirect chains and test your site on mobile devices regularly. Using tools like Screaming Frog, you can identify and resolve these issues, providing a smoother experience for both users and search engines on all devices.
Best Practices for Ongoing Redirect Chain Monitoring
Ongoing monitoring is essential to prevent redirect chains from reappearing as your website evolves. Start by scheduling regular crawls with Screaming Frog to detect new or accidental redirect chains after site updates, migrations, or content changes. Maintain a clear redirect mapping document to track all implemented redirects and their intended destinations. Periodically review and update this document to remove outdated or unnecessary redirects. Collaborate with your development and content teams to ensure any new URLs or structural changes are properly planned and tested for redirect efficiency. Use Screaming Frog’s reporting features to export and share findings, enabling quick resolution of issues. Additionally, set up automated alerts or reminders to audit redirects quarterly or after major site changes. By adopting these proactive practices, you can maintain a healthy site structure, preserve link equity, and ensure a seamless user experience for both visitors and search engines.
Mastering Redirect Chains with Screaming Frog: Your Path to SEO Success
In the dynamic world of SEO, managing and optimizing your website’s redirect chains is a critical task. Redirect chains can lead to decreased user satisfaction, poor search engine rankings, and a host of performance issues. However, by harnessing the power of Screaming Frog SEO Spider, you can seamlessly identify, analyze, and rectify these issues, ultimately leading to a more streamlined and efficient website.
This comprehensive guide has taken you through a step-by-step journey, from the initial crawl setup to the generation of reports on redirect chains. We’ve explored how to start a crawl, review response codes, identify URLs with redirect chains, and, most importantly, fix these issues to enhance your website’s performance and user experience. With each step, you’ve gained invaluable insights into the world of redirect chains and the tools available to address them.
In the end, using Screaming Frog to check redirect chains empowers you to not only uncover hidden issues but also to proactively enhance your website’s SEO performance. As you embark on this journey of optimization, remember that regularly auditing and maintaining your website is an ongoing commitment. By doing so, you ensure that your site remains user-friendly and search engine-friendly, ultimately driving success in the competitive online landscape.