Get a Customized Website SEO Audit and Online Marketing Strategy and Action Plan
Is anything goes around on your mind in terms of website migration? Then rest assured, you are at the right place at the moment, this blog will walk you through the checklist that you need to cover before migrating your website. Pre Migration SEO actually is the right job if anyone is thinking of a website CMS switchover or switching between hosting!
Basically, site migration refers to the procedure by which a website gets chiefly revamped in terms of search engines visibility impact. These areas may be about design, user experience, platform, site location, and structure.
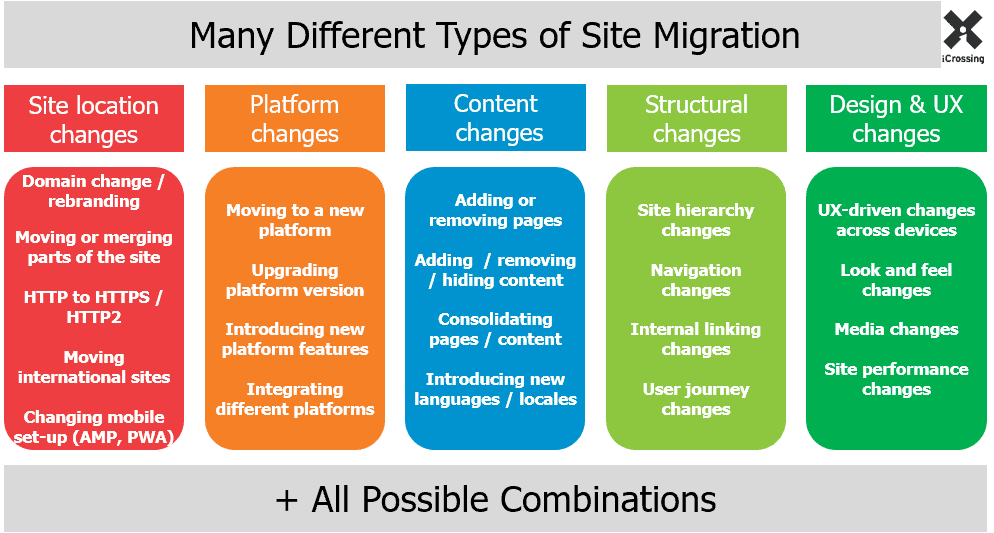
Understand The Website Migration Types
Website migration can be an overwhelming process. Without proper planning, it risks impacting traffic, rankings, and user experience significantly. A comprehensive SEO pre-website migration roadmap ensures a seamless transition, preserving your website’s search engine visibility and authority. Here’s the ultimate guide to navigating this process effectively.
Start by identifying the migration type, as it shapes your strategy. Examples include domain changes, structural shifts, or CMS upgrades. Each migration type presents unique challenges. Understanding them early helps tailor your SEO roadmap and address potential issues effectively.
For instance, switching to HTTPS involves specific technical steps, while a domain change requires thorough redirection planning. Stay informed.
Establish Clear Goals And KPIs
Define migration objectives to measure success. Common goals include traffic retention, improved user experience, and search engine ranking stability.
Setting clear KPIs, such as bounce rates or keyword rankings, helps monitor progress and identify areas needing adjustments post-migration.
By aligning goals with SEO priorities, you ensure efforts focus on maintaining organic traffic and achieving measurable results.
Conduct A Comprehensive Website Audit
A detailed website audit identifies strengths, weaknesses, and SEO opportunities. Analyze technical, on-page, and off-page SEO factors thoroughly. Use tools like Google Analytics, Search Console, and third-party platforms to gather data about site performance and rankings.
Additionally, create an inventory of top-performing pages to prioritize during the migration process, avoiding traffic losses.
Benchmark Current Metrics
Establish baseline metrics for comparison post-migration. Key indicators include organic traffic, keyword rankings, and crawl rates. Document existing backlinks, as they play a critical role in maintaining authority. Losing them can impact rankings significantly.
Regular benchmarking ensures you can detect performance drops early, helping you mitigate migration risks effectively.
Create A Detailed Migration Plan
A structured plan prevents chaos. Break down tasks into manageable phases, assigning responsibilities to relevant team members. Include pre-launch testing, live migration steps, and post-launch monitoring in the roadmap. This ensures comprehensive oversight.
Also, involve stakeholders like developers, designers, and SEO specialists early. Collaboration ensures every aspect aligns with the migration strategy.
Prepare A Redirect Strategy
Redirects ensure users and search engines find updated URLs seamlessly. Create a 301 redirect map covering all old-to-new URL changes.
Prioritize high-ranking pages and backlinks to prevent traffic disruptions. Redirect chains or loops must be avoided to maintain performance. Moreover, test the redirect map before implementation to identify errors, ensuring a smoother migration process for users and crawlers.
Optimize The Staging Environment
Test the migrated site in a secure staging environment before going live. This helps address issues without affecting user experience.
Use the staging phase to check URL structures, metadata, internal linking, and mobile responsiveness. Catching errors early saves time later.
Additionally, block search engines from crawling the staging site to prevent duplicate content indexing, which can harm rankings.
Address Content Optimization
Content is the backbone of SEO success. Ensure all content aligns with target keywords, user intent, and updated site structure. Review metadata, headers, and image alt texts for SEO compliance. Consistency helps search engines understand and rank content better.
Avoid content duplication during migration. Use canonical tags where necessary to consolidate authority for multiple similar pages.
Secure Backups before Migration
Always back up your website before starting migration. This ensures recovery if unexpected issues occur during the transition.
Store backups in multiple locations to minimize risks. Include databases, content, media files, and other critical components. Having reliable backups minimizes downtime and gives peace of mind, ensuring a fallback plan is always ready.
Communicate Changes to Stakeholders
Transparency is essential for successful migration. Regular updates keep stakeholders informed about timelines, challenges, and progress. Developers, marketers, and leadership should know their roles. Clear communication ensures everyone works towards shared goals efficiently.
Moreover, inform partners or affiliates affected by URL changes, helping them adapt and maintain seamless collaboration.
Test Thoroughly Before Launch
Pre-launch testing prevents avoidable errors. Focus on crawling, indexing, and user experience to ensure your website meets SEO standards.
Use tools like Screaming Frog or Sitebulb to crawl the site, identifying broken links, redirects, or missing metadata. Additionally, test page speed, mobile responsiveness, and schema markup. Addressing these ensures a smooth user experience post-launch.
Implement Structured Data Markup
Structured data enhances search engine understanding. Include schema markup for product pages, articles, or FAQs to improve visibility.
Review the markup implementation in the staging environment. Ensure it’s accurate and follows Google’s rich results guidelines.
By integrating structured data, your site gains enhanced SERP features, boosting click-through rates significantly.
Launch Strategically
Choose the right time for migration. Avoid peak traffic periods to minimize disruptions and potential revenue losses.
Double-check all elements before going live. Focus on redirects, analytics tracking, and server performance during the final checklist. Moreover, monitor the migration closely to identify issues immediately. A well-timed launch ensures a smoother transition for all stakeholders.
Monitor Post-Launch Performance
Post-launch monitoring is crucial. Track rankings, traffic, and user behavior to detect issues early and make necessary adjustments. Use Google Search Console to monitor the crawling and indexing of new URLs. Address errors like 404s or blocked resources promptly.
Additionally, compare post-migration metrics with benchmarks. This helps assess the migration’s success and optimize areas requiring improvement.
Inform Search Engines of Changes
Submit updated sitemaps to search engines post-migration. This helps them discover and index your new site structure efficiently.
Use the Search Console to monitor sitemap indexing progress. Resolve any warnings or errors to maintain strong search visibility.
By notifying search engines proactively, you ensure your site regains rankings and authority faster post-migration.
Update External Links & Mentions
Reach out to partners, affiliates, and other external sources linking to your site. Request updates to reflect new URLs. Moreover, maintaining a strong backlink profile post-migration helps retain domain authority and prevents ranking fluctuations.
Additionally, update your social media profiles, marketing campaigns, and business directories with the new URLs.
Analyze & Optimize Continuously
Website migration is not a one-time task. Monitor performance continuously and implement improvements based on data insights.
Identify trends affecting traffic, bounce rates, or conversions. Address user feedback to refine experience and SEO performance. A proactive approach ensures your website remains competitive, delivering value to users and search engines alike.
Safeguarding Organic Traffic During The Transition
Website migration, if poorly executed, risks significant traffic loss, harming overall site performance. A comprehensive roadmap mitigates this risk. Therefore, redirect strategies ensure users and search engines are directed to relevant pages, preserving traffic flow throughout the migration process.
Broken links or redirect errors confuse search engines, causing ranking drops. Proactively testing redirects prevents such avoidable mistakes. Additionally, ensuring updated sitemaps guide search engine crawlers to the new site structure keeps traffic disruption minimal.
Analyzing baseline metrics beforehand helps detect early signs of traffic loss, allowing quick corrective measures post-migration. Hence, preserving traffic ensures business continuity, especially for e-commerce or content-heavy websites reliant on organic visibility.
Retaining Backlink Authority to Protect Rankings
Backlinks significantly influence domain authority and rankings. Losing or mismanaging backlinks during migration impacts search engine performance.
A redirect strategy ensures all backlinks lead to updated URLs, preserving their value. Neglecting this step harms SEO efforts immensely. So, conduct a comprehensive audit of your backlink profile before migration. Focus on high-authority links that drive substantial traffic.
Reach out to external sources linking to your site, asking them to update URLs. This reinforces backlink equity during migration. Search engines treat broken or irrelevant links as signals of poor quality, so maintaining a robust backlink profile is critical.
Minimizing Technical SEO Pitfalls for Long-Term Success
Website migration introduces numerous technical complexities, from URL structure changes to indexing and crawlability issues. Addressing these ensures long-term SEO stability.
Improper handling of canonical tags or duplicate content confuses search engines, risking penalties. Test and validate these elements pre-launch. Structured data should also be intact or updated. It helps search engines understand your site better, retaining visibility in search results.
Redirect chains or loops slow down crawling and waste crawl budget. Testing ensures a seamless path for users and crawlers alike. Also, monitoring post-migration technical metrics, such as crawl rates and server response times, helps identify and resolve underlying issues promptly.
Technical optimization lays a solid foundation for search engine trust, boosting rankings and improving user satisfaction.
So, we can say that, a pre-website migration SEO roadmap ensures minimal disruptions and sustained rankings. It combines thorough planning, testing, and monitoring. Therefore, by following this roadmap, you safeguard your website’s performance and set the stage for long-term SEO success.
There are various types of site pre migration SEO procedure. Let’s dive into the pre website migration checklist one by one:
Step 1: Create a back up for the website
It is highly recommended to keep a safe back up for your website’s files so that if anything goes wrong with your site during the migration then you can simply restore the archived version of the website as it used to appear on live.
Step 2: Create a staging site
By creating a staging site you will pave the way for the developers to test whatever functionalities they need to check in order to develop the newer version of the site. Also can have some live checks regarding contents, site layout (how it will look after going live), implementation of 301 redirects, etc before going live.
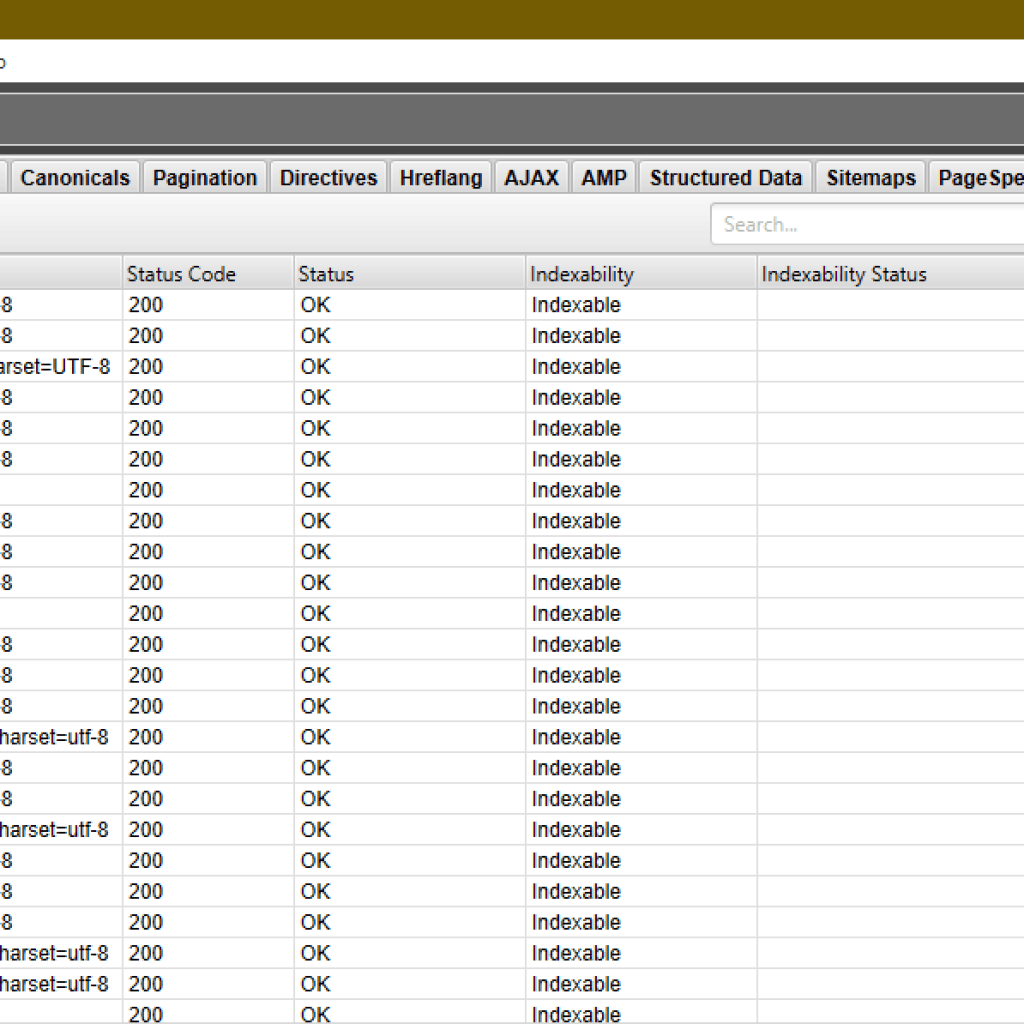
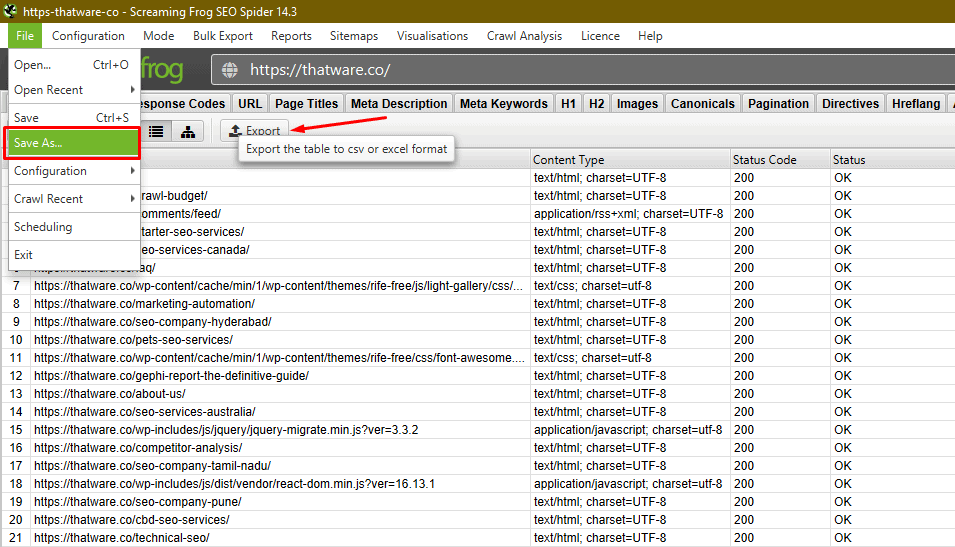
Step 3: Crawl the whole site
Use Screaming Frog to crawl your website in order to get a full URL and content inventory of your site. With a view to mapping old URLs to new URLs in your 301 redirect map, it is advisable that you completely crawl your site. By doing this, you will have an overview of which pieces of content to move over and what internal links need to be changed to reflect the new URL structure.
You can also save the crawled file of your site for future reference for fixation or can export the list.
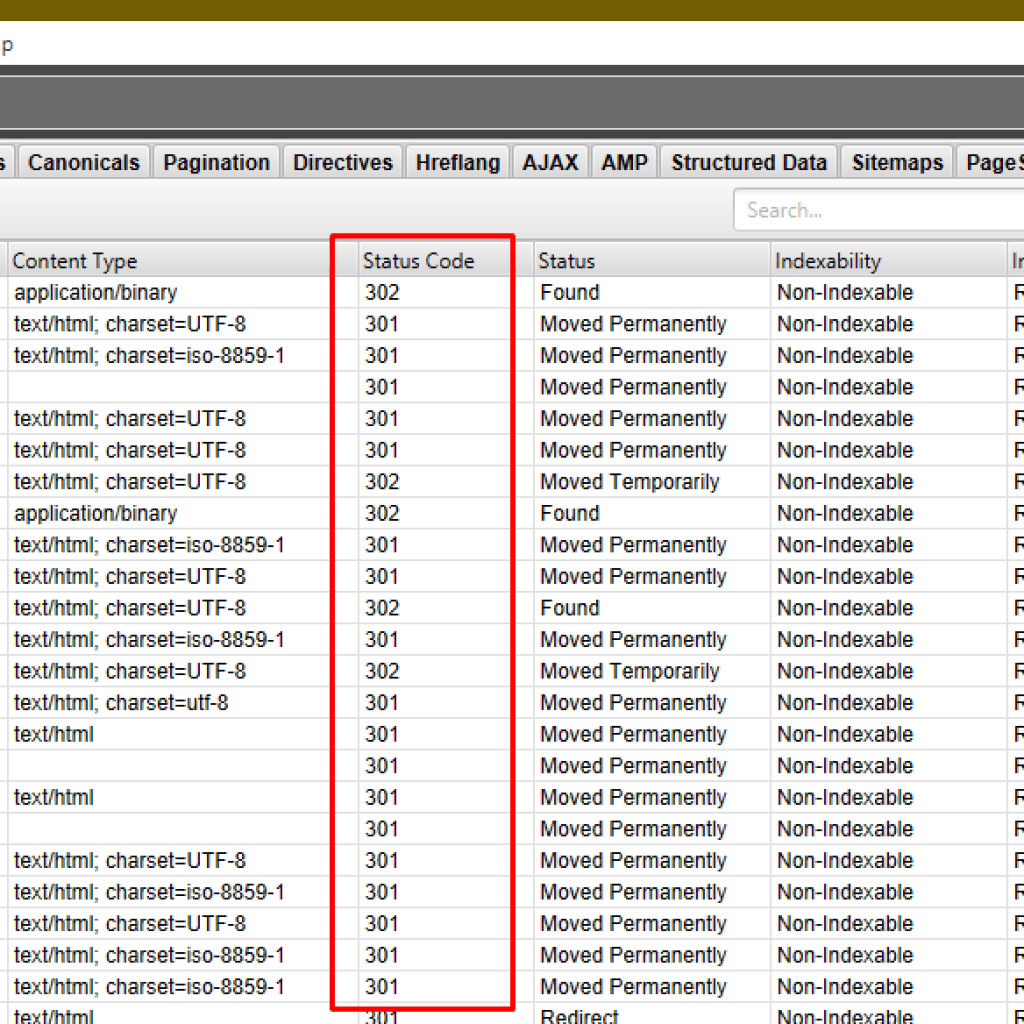
Step 4: 301 Redirects Implementation
You need to create a full 301 redirect map based on your SEO migration score sheet and implement it on your website. This assists that the old website URLs redirect properly to their new URLs, and also that internal links redirect properly, in case you missed them. You’ll want to crawl this map before you implement it to check that no redirects are broken like this below:
Step 5: Internal Links Update
After switching to your new URLs and have an inventory of what they’ll be, go to your staging website and begin updating internal links to get rid of having internal redirects or broken pages. You can find internal links using ScreamingFrog, including their anchor text.
Step 6: Custom 404 Page Creation
Many site owners make a common mistake by avoiding creating a custom 404 page. It is highly advisable to create an enticing custom 404 landing page when the user finds fault with the broken link in your site and redirected to this specific page. Not having a 404 page leads to a blank page that users can’t navigate from, causing them to leave your site altogether and as a result, your bounce rate score will be much higher.
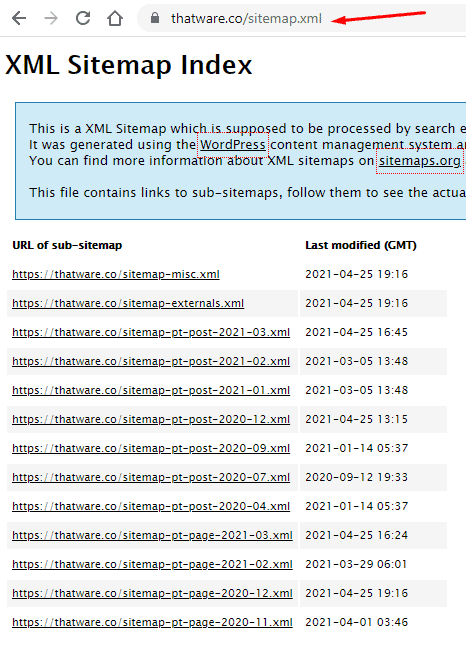
Step 7: Sitemap Update
Make sure that all of your new URLs are accounted for, create a new sitemap XML that can be attached to your website (https://thatware.co/sitemap.xml), and upload it to your Google Search Console property.
Step 8: Old to New URL Mapping
You should keep track of old URLs and the new URLs so that you can figure out which were previously mapped URLs, and to make things similar you would need the list for the new one. During a site migration, all of the old pages exist on the new site. Obviously, removing a page removes its ability to capture search engine traffic. So it’s better not to drop too many pages during the migration as it may lead Google to conclude that the new site isn’t the same as the old site, causing you to lose your rankings.
Step 9: Resolve duplicate content issues
If both multiple versions of a URL are published, it results in duplicate content. If self-canonicalization is put in place properly, this should be avoided, but we would recommend setting up redirect rules in .htaccess so that only one version of the page is accessible. Also, ensure that links are consistent to avoid redirects from internal links.
Step 10: Google My Business and Bing Places Update
If your website is based in a local place, then you will surely have a Google My Business and Bing Places account, also ensure that the old domain URL should replace with the new domain in order to provide perfect value for your citation score. This is a local SEO strategy that a localized business should implement.
Step 11: More Mobile-Friendliness
Google prefers mobile-first indexing to prioritize website in order to make them appear on the mobile SERP (search engine results page). So please make sure that your new website should comply with all the mobile-friendly protocols which also addressed as responsive web design that your site looks perfect in any kind of devices along with the desktop version. Pre Migration SEO will be greatly hampered if any mobility issues persist before a CMS switch!
Step 12: Don’t Forget to Add Schema
One of the crucial things in a site’s SEO health is to provide relevant schema code to the website. To help you to generate schema for your site here is a link you can work on:
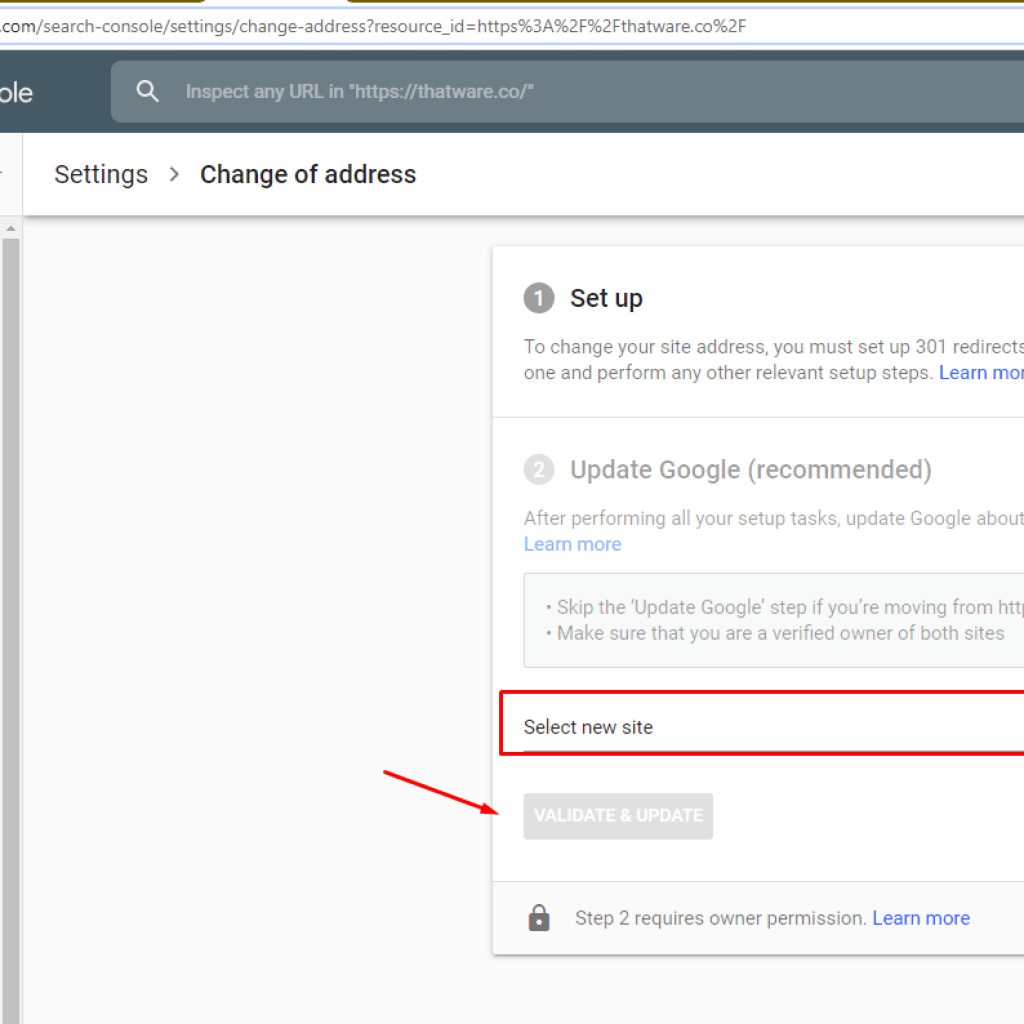
Step 13: Let Google know about your new site’s URL
Google Search Console has a feature to use the Change of Address tool in order to notify your site’s new url update. To make this change, you have to follow these steps below:
- You must be a verified owner of both the old and new properties in Search Console. You must use the same Google account to manage both properties.
- The Change of Address tool can be used only on properties at the domain level: that is, you can move example.com, m.example.com, or http://example.com. You cannot move properties at the path level, such as http://example.com/petstore/
- The tool does not move any subdomains below the specified domain (including www). So if you specify example.com in the tool, it will not move www.example.com or m.example.com. However, all paths under the domain are affected (example.com/any/path/here).
- The tool moves all protocols of your source property. So if you specify http://example.com, it also moves https://example.com
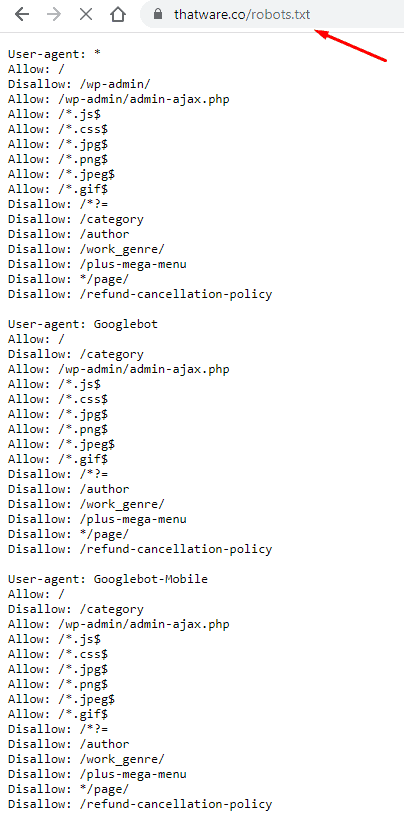
Step 14: Most Important Update: Robots.txt file
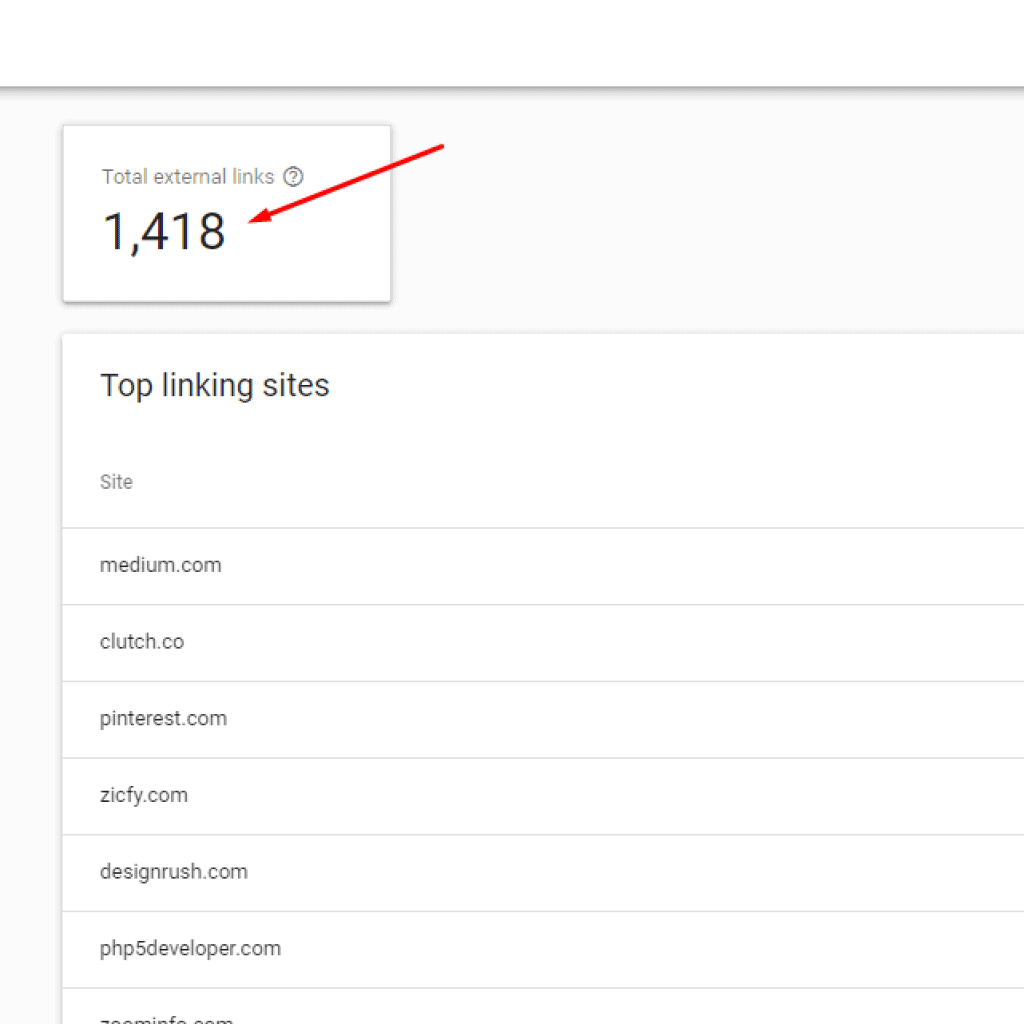
Step 15: Update Your Backlinks
Your old website has definitely plenty of backlinks pointing to it; in order to keep track of those backlinks either you can use any tools like ahrefs, SEMRUSH or can simply go to your Search Console property like this below:
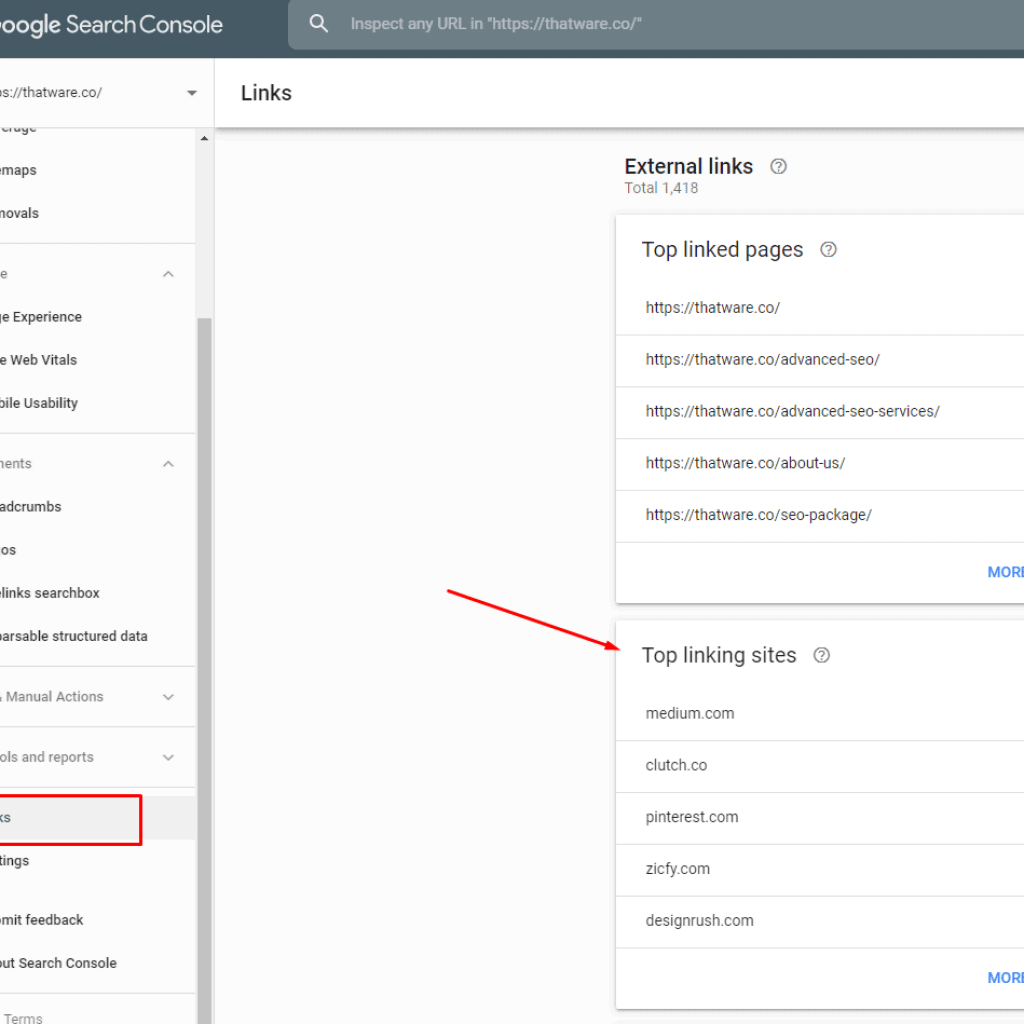
Once you have the list, update the backlinks with the updated new url to retain the value of the link equity.
Wrapping Up
Once you wrapping up with your entire pre-migration SEO checklist here mentioned above, you are good to go to launch your newly migrated site. Though your job is not yet over, again you need to follow some post-migration protocols to keep your campaign healthy.