SUPERCHARGE YOUR ONLINE VISIBILITY! CONTACT US AND LET’S ACHIEVE EXCELLENCE TOGETHER!
⭐️What is schema?
Schema markup, found at Schema.org, is a form of microdata. Once added to a webpage, schema markup creates an enhanced description (commonly known as a rich snippet), which appears in search results.

Top search engines – including Google, Yahoo, Bing, and Yandex – first started collaborating to create Schema.org, back in 2011.
⭐️Importance:
Schema markup is especially important in the age of Hummingbird and RankBrain. How a search engine interprets the context of a query will determine the quality of a search result. Schema can provide context to an otherwise ambiguous webpage.
Adding Schema markup to your HTML improves the way your page displays in SERPs by enhancing the rich snippets that are displayed beneath the page title. Search results with more extensive rich snippets (like those created using Schema) will have a better click-through rate.
⭐️Item List Schema implementation for e commerce website
To implement an item list schema for an e-commerce website, you can use the Schema.org vocabulary, which provides a standardized way to describe structured data on the web. Here’s an example of how you can implement the item list schema for your e-commerce website:
<!– Include the Schema.org markup –>
<script type=”application/ld+json”>
{
“@context”: “https://schema.org”,
“@type”: “ItemList”,
“name”: “Product List”,
“itemListElement”: [
{
“@type”: “Product”,
“name”: “Product 1”,
“url”: “https://example.com/product1”,
“image”: “https://example.com/images/product1.jpg”,
“description”: “Description of Product 1”,
“offers”: {
“@type”: “Offer”,
“price”: “19.99”,
“priceCurrency”: “USD”
}
},
{
“@type”: “Product”,
“name”: “Product 2”,
“url”: “https://example.com/product2”,
“image”: “https://example.com/images/product2.jpg”,
“description”: “Description of Product 2”,
“offers”: {
“@type”: “Offer”,
“price”: “29.99”,
“priceCurrency”: “USD”
}
}
// Add more products as needed
]
}
</script>
Replace the placeholder values in the markup with the actual details of your products. Add more itemListElement objects to represent additional products.
Modify the values under each Product to match the details of your products. For example, replace “Product 1” with the name of your first product, “https://example.com/product1” with the URL of your product page, “https://example.com/images/product1.jpg” with the URL of the product image, and so on. Adjust the Offer details such as price and currency as needed.
Repeat step 3 for each product you want to include in the item list.
Place the modified HTML code in the appropriate location within your e-commerce website’s template or pages.
Implementation of ItemList Schema:
⭐️Current Observation:
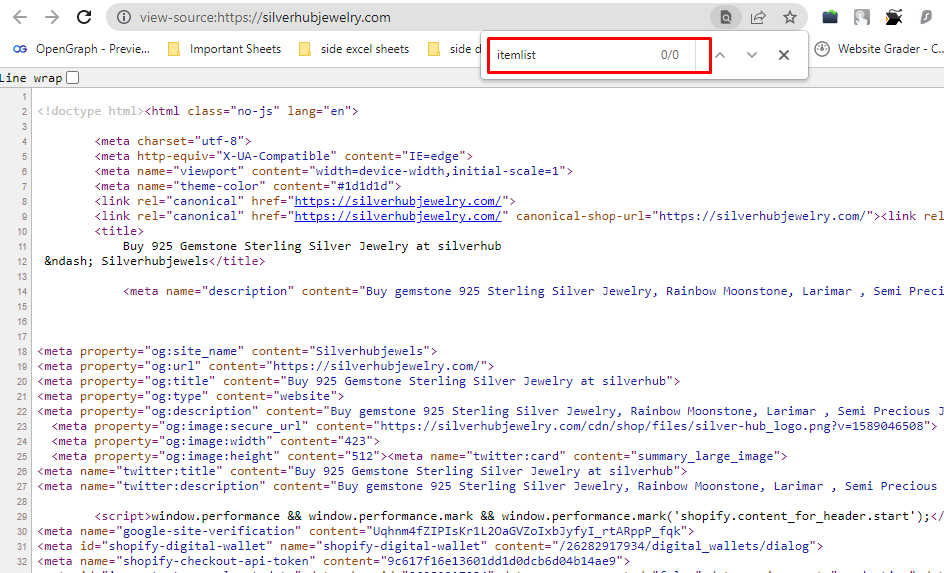
It can be seen that currently our site has no itemlist schema.
Proper Schema-Markup:
<!– Include the Schema.org markup –>
<script type=”application/ld+json”>
{
“@context”: “https://schema.org”,
“@type”: “ItemList”,
“name”: “Product List”,
“itemListElement”: [
{
“@type”: “Product”,
“name”: “Spiny Oyster Turquoise Natural Gemstone 925 Solid Sterling Silver Jewelry Designer Adjustable Ring”,
“url”: “https://silverhubjewelry.com/products/spiny-oyster-turquoise-natural-gemstone-925-solid-sterling-silver-jewelry-designer-adjustable-ring-size-5-to-13”,
“image”: “https://silverhubjewelry.com/cdn/shop/files/111_2_1880x_1.jpg?v=1682505826”,
“description”: “Discover the stunning elegance of Spiny Oyster Turquoise jewelry. Handcrafted with 925 sterling silver, this ring is a true natural gemstone treasure.”,
“offers”: {
“@type”: “Offer”,
“price”: “2,476.26”,
“priceCurrency”: “Rs”
}
},
{
“@type”: “Product”,
“name”: “Ethiopian Opal Natural Gemstone 925 Solid Sterling Silver Jewelry Designer Adjustable Ring”,
“url”: “https://silverhubjewelry.com/products/ethiopian-opal-natural-gemstone-925-solid-sterling-silver-jewelry-designer-adjustable-ring-size-5-to-13-new-33”,
“image”: “https://silverhubjewelry.com/cdn/shop/products/116.1.jpg?v=1683014083”,
“description”: “Discover the enchanting beauty of Ethiopian Opal. Handcrafted with 925 sterling silver, our adjustable ring showcases nature’s vibrant gemstone.”,
“offers”: {
“@type”: “Offer”,
“price”: “2,311.12”,
“priceCurrency”: “Rs”
}
}
// Add more products as needed
]
}
</script>
⭐️Implementing Process:
- First go to the Google Tag Manager.
- Then active the preview mode.
- Next create one tag.
- Select custom HTML and paste the above code there and save the Tag.
- Then create one trigger and select ‘Page View’.
- If you want to implement the code for all pages then select ‘All Page View’ and if you want to implement the code for some particular pages then select ‘Some Page View’ and select the page path and put the page path in it.
- Add the trigger in the Tag.
- Then at last submit it.
Conclusion:
By implementing the item list schema, you provide structured data that search engines and other platforms can use to understand the content of your e-commerce website better, potentially leading to enhanced visibility and rich search results for your products.
Here are some of the advantages of using ItemList schema markup:
Increased visibility in search results: When search engines see that your website is using ItemList schema markup, they are more likely to show your listings in rich snippets. This can help to improve your click-through rate (CTR) and increase traffic to your website.
Improved user experience: Rich snippets can also improve the user experience for people who are searching for information on your website. For example, if you have a list of products, a rich snippet can show the price, rating, and other information about each product. This can help users to find the information they are looking for more quickly and easily.
Enhanced SEO: ItemList schema markup can also help to improve your website’s SEO. This is because search engines use structured data to better understand the content of your website. When they have a better understanding of your content, they are more likely to rank your website higher in search results.
⭐️HTML Sitemap Creation using Python
An HTML sitemap is a webpage that provides an organized list or hierarchy of links to all the pages on a website. It serves as a navigational tool for visitors and search engines.
Step 1:
Create a folder on desktop using project name or any other desire name.

Step 2:
Create an xlsx file on that folder.
Rename it to “sitemap_data”

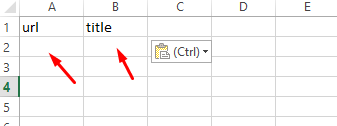
Open the xlsx file and create 2 column like this –
Now go to screaming from a crawl the website.
And go to all page titles –

Copy all URLs and Titles, and paste it on the xlsx file –

Now save the file.
Step 3:
import openpyxl
def create_html_sitemap(xlsx_file, output_file):
# Load the Excel file
wb = openpyxl.load_workbook(xlsx_file)
sheet = wb.active
# Create the HTML sitemap
sitemap = ‘<ul>\n’
for row in sheet.iter_rows(values_only=True):
url = row[0]
title = row[1]
sitemap += f'<li><a href=”{url}”>{title}</a></li>\n’
sitemap += ‘</ul>’
# Write the sitemap to the output file
with open(output_file, ‘w’) as f:
f.write(sitemap)
print(‘HTML sitemap created successfully.’)
# Example usage
xlsx_file = ‘sitemap_data.xlsx’ # Replace with the path to your Excel file
output_file = ‘sitemap.html’ # Replace with the desired output file path
create_html_sitemap(xlsx_file, output_file)
Copy this code on visual studio or notepad –
Save this code file as python file –

And rename the file as “html”
Save it on that same folder.
Now open anaconda and go to your desktop folder using cd command –
And install this library – “pip install openpyxl”

Now run the code –
Type – python html.py

Our html sitemap is created.
Go to the folder and check it.
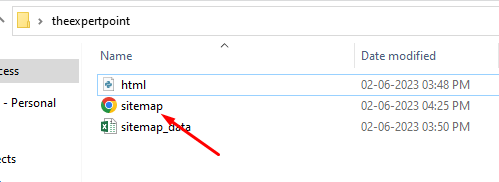
Open the file –
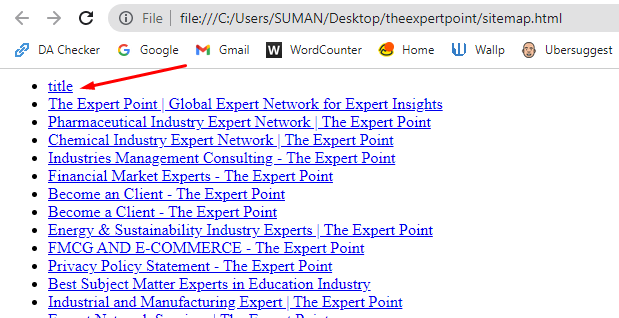
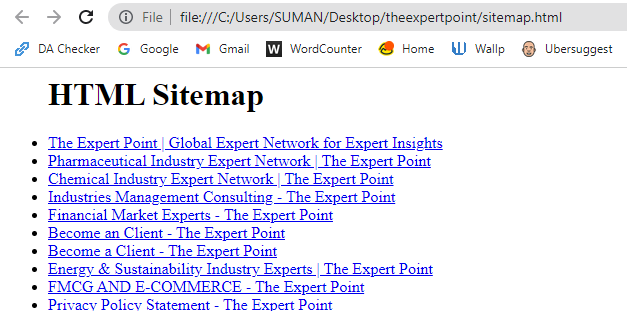
The html sitemap looks good but has an unwanted page.
Need to remove it.
Open the file on HTML editor –
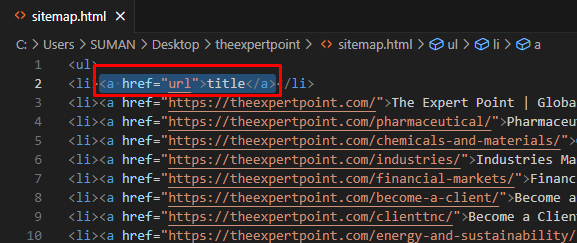
Remove this part only.
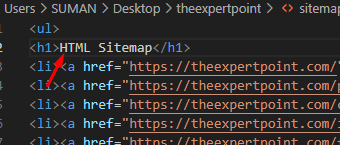
Replace it with HTML Sitemap as h1.
Now Open and check it –
