SUPERCHARGE YOUR ONLINE VISIBILITY! CONTACT US AND LET’S ACHIEVE EXCELLENCE TOGETHER!
The AI-Powered Neural Topic Modeling for Content Clustering and SEO Strategy project aims to use advanced AI technology (specifically Neural Topic Modeling) to help website owners understand their content better. The project aims to:

- Automatically organize content into meaningful groups (called clusters) based on the discussed topics.
- Improve the website’s SEO (Search Engine Optimization) by identifying the best keywords and linking similar pages together to boost visibility in search engine rankings.
- Recommend similar content to users, helping them easily find other relevant pages on the website.
Let’s break down each part in simple language:
1. Neural Topic Modeling (NTM):
Neural Topic Modeling (NTM) is a powerful AI-driven technique designed to analyse large volumes of textual data and automatically uncover the underlying themes present within that content. These themes, known as topics, represent the recurring ideas, subjects, or areas of focus that appear throughout a website’s pages, blogs, or articles.
Unlike traditional keyword analysis, which relies on predefined terms, NTM works by understanding patterns in language. It examines how words and phrases naturally appear together across different pieces of content. By doing so, it can identify topics without human intervention. In simple terms, it allows artificial intelligence to “read” your website and determine what it is truly about.
For example, if your website contains multiple articles covering SEO practices, digital marketing trends, analytics, and web development, Neural Topic Modeling will recognise these as distinct topics. Even if the articles use varied wording or phrasing, the AI can still group them correctly by understanding context rather than relying on exact matches.
This capability is extremely valuable for websites with growing content libraries. As more pages are added over time, NTM continuously adapts, ensuring that emerging themes are identified and existing ones are refined. The result is a deeper, more accurate understanding of your content landscape.
2. Content Clustering:
Once Neural Topic Modeling identifies the key topics, the next step is content clustering. Content clustering involves grouping together pages or articles that share the same or closely related themes. Each cluster represents a specific topic area on your website.
Think of content clustering as organising a large library. Instead of having books scattered randomly, they are neatly placed into sections such as marketing, technology, or business strategy. Similarly, if your website has multiple articles discussing SEO strategies, keyword research, and technical optimisation, the system automatically places them into a single SEO-focused cluster.
This structured grouping offers several advantages. From a user perspective, it makes navigation smoother and more intuitive. Visitors can easily explore related content without needing to search manually. From a management perspective, it gives website owners a clear overview of what content exists, what topics are well-covered, and where gaps may be present.
Content clustering also ensures consistency across topic areas. It helps maintain thematic relevance, which is crucial for both user satisfaction and search engine interpretation.
3. SEO Strategy: How Does It Help SEO?
Search Engine Optimisation (SEO) focuses on improving a website’s visibility on search engines such as Google. Higher rankings mean increased traffic, better brand exposure, and more opportunities for conversions. This project enhances SEO by using Neural Topic Modeling in two key ways.
Keyword Strategy:
NTM identifies the most relevant and high-impact keywords associated with each topic cluster. Instead of guessing which keywords to target, website owners gain data-backed insights into the terms users are most likely searching for. For instance, if the system detects strong relevance around topics like “SEO services” and “link-building,” those terms can be strategically prioritised within the content.
Internal Linking:
The project also analyses content similarity across pages. By understanding which pages are closely related, it provides guidance on internal linking opportunities. Internal links help search engines understand the structure of your website and the relationships between different pages. This improves crawlability, indexing efficiency, and overall ranking potential.
Together, these strategies ensure that your website aligns more closely with how search engines interpret content relevance and authority.
4. Recommendation System: What Does It Do?
Beyond organisation and optimisation, the project functions as an intelligent recommendation system. When a visitor views a specific page, the system analyses its topic and suggests other pages with similar or complementary content.
For example, if a user is reading an article about SEO strategies, the recommendation system might suggest related pages on competitor keyword analysis, technical audits, or link-building techniques. These recommendations are context-aware, meaning they are based on actual content similarity rather than generic rules.
This approach significantly enhances user engagement. Visitors are more likely to explore additional pages, spend more time on the site, and interact with multiple pieces of content. As a result, bounce rates decrease while session duration increases—both of which are positive signals for search engines.
5. How Does This Help a Website Owner?
From a website owner’s perspective, this project delivers measurable value across multiple areas.
Content Clustering:
Manual organisation of content becomes unnecessary. The system automatically groups pages, saving time and reducing the risk of misclassification.
SEO Optimisation:
With clear keyword insights and internal linking suggestions, website owners can implement targeted improvements that directly impact search visibility.
User Engagement:
By offering relevant content recommendations, the website becomes more engaging and user-friendly, leading to higher retention and improved conversion potential.
Overall, the project transforms content management from a manual, time-consuming process into an intelligent, automated system.
Example of How It Works:
Imagine you own a website offering digital marketing services. Your pages include:
- SEO services
- Social media marketing
- Link-building techniques
- Content proofreading
Using this project:
- Neural Topic Modeling analyses all pages and identifies core themes such as SEO, social media, and content services.
- The system clusters related pages into organised topic groups.
- It suggests high-value keywords for each topic, helping you optimise content effectively.
- It highlights which pages should be internally linked, strengthening site structure.
- It generates personalised content recommendations for users based on the pages they view.
Key Benefits for Website Owners:
- Save time by automating content organisation
- Improve SEO through data-driven keyword insights and internal linking
- Increase user engagement with intelligent content recommendations
This integrated approach ensures that both users and search engines experience your website at its best.
What is Neural Topic Modeling (NTM)?
Neural Topic Modeling combines traditional topic modeling techniques (like Latent Dirichlet Allocation, LDA) with neural networks. Topic modeling is a process that discovers hidden topics or themes within a large collection of text data. Neural Topic Modeling enhances this by using deep learning (neural networks) to identify complex, nuanced topics in the content, improving the accuracy of topic discovery.
Use Cases of Neural Topic Modeling:
- Content Organization:
Neural Topic Modeling (NTM) enables websites to automatically structure large volumes of content into clearly defined thematic groups. Instead of relying on manual tagging or rigid taxonomies, NTM analyses contextual relationships between words and sentences to uncover natural topic boundaries. This makes it significantly easier to build content clusters, pillar pages, and internal linking frameworks. As a result, websites achieve better navigation, improved crawl efficiency for search engines, and a more intuitive reading experience for users seeking related information. - SEO Optimization:
NTM plays a crucial role in modern SEO by identifying latent themes hidden deep within existing content. Rather than focusing only on surface-level keywords, it reveals semantic patterns and topic gaps that traditional keyword tools often miss. These insights help guide content expansion, refine keyword targeting, and align pages with user search intent. By mapping content to concept-driven topics, websites can strengthen topical authority, reduce keyword cannibalisation, and improve rankings across a broader set of relevant queries. - Recommendation Systems:
Content platforms and e-commerce websites leverage NTM to power intelligent recommendation engines. By understanding topic-level similarities between articles, products, or user interactions, NTM enables highly relevant suggestions. This leads to personalised browsing experiences, higher engagement, and improved conversion rates. Recommendations become context-aware rather than rule-based, adapting dynamically as new content or products are introduced.
Real-Life Implementations:
- Customer Reviews Analysis:
E-commerce platforms use NTM to process thousands of customer reviews at scale and identify the themes customers care about most. Topics such as delivery speed, product durability, pricing concerns, or customer service emerge organically from unstructured feedback. Businesses can then prioritise improvements, refine messaging, and respond strategically to customer sentiment without manual review analysis. - News Websites:
News publishers rely on NTM to automatically categorise and group related stories across evolving topics. This allows real-time creation of content hubs around ongoing events, trends, or issues. It also improves content discovery, encourages deeper reader engagement, and supports long-term archival organisation. - Search Engines:
Search engines apply NTM to enhance query understanding and content classification. By recognising nuanced topic relationships, they deliver more precise and context-aware search results. This improves relevance, reduces ambiguity, and supports advanced features such as semantic search and conversational queries.
How is NTM used on Websites?
For website-based projects, Neural Topic Modeling (NTM) is applied to examine large volumes of textual content and identify meaningful thematic patterns across pages. It works by analysing blogs, landing pages, product descriptions, service pages, and other written assets to automatically group them into logical topic areas. This approach is especially valuable for modern, content-heavy websites where manual categorisation becomes inefficient.
This process is highly effective for:
Optimising SEO and Keywords:
NTM goes beyond surface-level keyword matching. It uncovers hidden semantic topics embedded within your content, even when exact keywords are not repeated. These insights help refine keyword targeting, improve topical authority, and align pages with how search engines now interpret intent-driven queries. As a result, websites can achieve stronger rankings and better visibility across relevant search terms.
Content Clustering:
By identifying related themes, NTM enables the creation of structured content clusters. These clusters improve internal linking, make content easier to explore, and help users navigate related topics naturally. Well-organised clusters also signal topical relevance to search engines, strengthening overall SEO performance.
What kind of data does NTM need?
Text Data:
NTM relies on substantial amounts of text to function effectively. For website projects, this includes all written materials such as blog posts, service descriptions, category pages, FAQs, and informational content. The richer and more diverse the textual dataset, the more accurate and insightful the topic modelling results become.
Input Formats:
Text data can be supplied in multiple formats. One common method is providing URLs, where the system scrapes and extracts text directly from web pages. Another option is using structured datasets such as CSV files. In this case, the content is organised into columns—typically including page titles, URLs, and body text. Proper structuring ensures smoother processing and more precise topic discovery.
How does NTM work technically?
Preprocessing the Data:
Before analysis begins, the text undergoes preprocessing. This includes cleaning tasks such as removing stopwords (for example, “the,” “and,” “is”), eliminating noise, and standardising word forms. After cleaning, the text is transformed into numerical representations through vectorisation, allowing neural networks to interpret and process language mathematically.
Neural Network and Topic Discovery:
Once vectorised, the data is fed into a neural network designed to detect deeper semantic relationships. Unlike traditional models such as Latent Dirichlet Allocation (LDA), which rely on simpler probability-based assumptions, NTM captures complex contextual patterns. This enables it to recognise nuanced themes, overlapping topics, and evolving content relationships across the website.
Output:
After processing, NTM produces a structured output consisting of topic groups represented by key terms and associated pages. For a website, this reveals dominant themes, subtopics, and content gaps. These insights provide clear direction for content optimisation, internal linking, and future publishing strategies.
Why is NTM helpful for content clustering and keyword strategies?
By uncovering hidden semantic topics, NTM enables:
Optimised Content Clusters:
Related pages are grouped intelligently, enhancing site structure and improving user engagement through intuitive navigation.
Enhanced Keyword Strategy:
The discovered topics highlight relevant keywords and search intents, helping refine SEO efforts and align content with how users actually search online.


1. Import Required Libraries for the Project
- Purpose: requests is a Python library used to make HTTP requests. In this project, we use it to access the content of the web pages listed in the URLs. When we “request” a webpage, this library gets the HTML content of that webpage for us to work with.

- Purpose: BeautifulSoup is a library used for parsing HTML and XML documents. Webpages are written in HTML, and this tool helps extract only the relevant text (ignoring HTML tags like <div>, <p>, etc.). It’s like scraping the meaningful content from the raw HTML that the requests library fetches.

- Purpose: re is Python’s regular expression module. Regular expressions are used for searching, matching, and manipulating text. We use it here to clean the text (e.g., removing digits, punctuation, or unwanted characters) before we analyze it.

- Purpose: nltk is the Natural Language Toolkit, a powerful library for processing text. It provides tools for tasks such as tokenization (splitting text into words), removing stopwords (like “the,” “is,” etc.), and performing other natural language processing (NLP) tasks.

- Purpose: The stopwords corpus is a part of the nltk library and contains lists of common words in a language (like “the,” “is,” “in,” etc.). These words are not very informative for analysis, so we remove them from the text to focus only on meaningful words.

- Purpose: CountVectorizer is a tool that transforms text into a Bag of Words model. This converts the text into a matrix of word counts where each row represents a document, and each column represents a word. This is essential because machine learning models like Neural Topic Modeling need text in a numerical format to work with.

- Purpose: cosine_similarity is used to calculate how similar two vectors are. In this project, it calculates the similarity between the topics of different web pages. Two pages that have a high cosine similarity score are considered to be about similar subjects, which is useful for making content recommendations.

- Purpose: corpora and models are part of the Gensim library, which is used for topic modeling. In this case, we use them to build the Latent Dirichlet Allocation (LDA) model. The LDA model automatically discovers topics from text data by analyzing word patterns across documents (in this case, the web pages).
- corpora: Helps create a dictionary that maps words to their unique IDs.
- models: Contains tools to build the LDA model, which will discover the hidden topics in the content.

- Purpose: numpy is a library for working with arrays and matrices, which are essential data structures in machine learning. Here, it is used to store the topic distributions (i.e., how much each topic is present in each webpage) in matrix form. It’s also useful for mathematical operations.
2. Download English Stopwords Using NLTK

- Purpose: Before using the list of stopwords (common words that don’t add value to the analysis), we need to download them using nltk. This command ensures that we have the necessary stopwords in English to remove from the text before further processing.

Function: fetch_webpage_content
This function takes a list of URLs as input and returns a list of raw text extracted from each webpage.
1. Define the function and initialize the list:

- Explanation:
- The function fetch_webpage_content accepts one parameter called urls, which is a list of web page URLs.
- content_list is an empty list that will be used to store the text content extracted from each webpage.
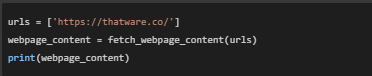
- Example: In this case, the input could be:

2. Loop over each URL:

· Explanation:
- This loop goes through each URL in the list urls. It will repeat the process for every URL to retrieve the content.
· Example: The URL https://thatware.co/ will be the first (and only) URL in this case, so the function will loop through it.
3. Send an HTTP request to get the webpage content:

· Explanation:
- requests.get(url) sends an HTTP request to the website server and tries to download the webpage’s content.
- The response from the server is stored in the variable response. This contains the HTML content of the webpage.
· Example:
- For the URL https://thatware.co/, this sends a request to the server hosting the ThatWare website. The response will contain the HTML code for the homepage.
4. Parse the HTML content:

· Explanation:
- The BeautifulSoup object soup parses the HTML content (which is in response.content) and allows us to work with it as a structured document.
- html.parser is a built-in HTML parser that helps break down the HTML into meaningful elements.
· Example:
- The BeautifulSoup library will now read through the HTML from https://thatware.co/ and allow us to extract text from the page, ignoring the HTML tags (like <div>, <h1>, etc.).
5. Extract visible text from the webpage:

· Explanation:
- soup.get_text(separator=’ ‘) extracts all the visible text from the webpage (without HTML tags). The separator=’ ‘ argument ensures that different blocks of text are separated by spaces.
- The result is a long string containing all the visible text on the page, with spaces between different sections.
· Example:
- From the page https://thatware.co/, this will extract the visible text content such as the homepage’s headers, body text, and any other readable content, ignoring HTML code like <div>, <h1>, etc.
6. Add the extracted text to the list:

· Explanation:
- The extracted text is then added to the content_list. This ensures that for each URL processed in the loop, we store its content in this list.
· Example:
- For the URL https://thatware.co/, the visible text of the homepage (such as “ThatWare SEO Services,” “AI-Powered SEO Solutions,” etc.) will be added as a string to content_list.
7. Handle any errors that occur:

- Explanation:
- The try block ensures that if something goes wrong (e.g., the webpage cannot be reached, or the URL is incorrect), the except block will handle it.
- It prints an error message that includes the URL that caused the error and a description of the error (str(e)).
- Example:
- If there’s an issue fetching the content from https://thatware.co/, this part of the code will catch the error and print something like:

8. Return the list of content:

- Explanation:
- After all the URLs have been processed, the function returns content_list, which contains the extracted text from each webpage.
- Example:
- For https://thatware.co/, the function would return a list containing the visible text from the homepage:

Complete Example:
Let’s say we call this function with one URL:
The output would be a list containing the text content of the page, similar to:

What Does This Function Do?
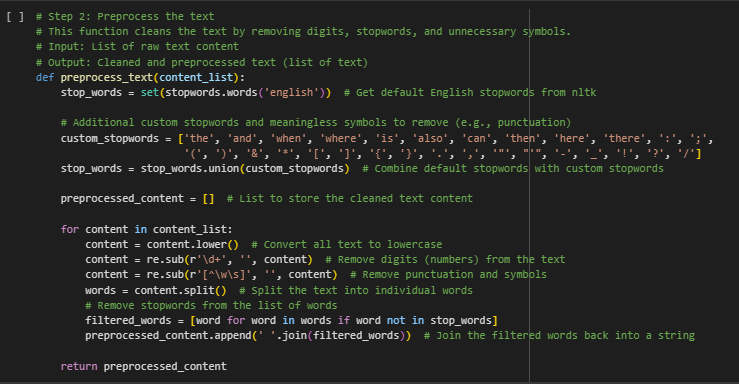
The preprocess_text function is designed to clean text data. When we collect raw text from webpages, it contains unnecessary information like punctuation, numbers, and common words like “the,” “and,” “is.”
Step-by-Step Explanation
1. Initialize the Stopwords:

· Explanation:
- The stopwords.words(‘english’) gets a list of common English words that are not useful for analysis (like “the,” “is,” “and”).
- These words are called stopwords, and they don’t help when you are trying to understand the main ideas or topics in a document.
- set(stopwords.words(‘english’)) stores these stopwords in a set (which is a type of collection that makes checking for words faster).
· Why this is important:
- Removing these common words helps us focus on the more important and meaningful words in the text.
2. Add Custom Stopwords and Symbols:

· Explanation:
- In addition to the default stopwords from the nltk library, this line defines custom stopwords and symbols that we also want to remove.
- This includes:
- Extra common words: “the,” “and,” “when,” “where,” etc.
- Punctuation: Symbols like “:”, “;”, “(“, “)”, etc.
- These words and symbols are not useful for understanding the topics in the text, so we will remove them.
· Why this is important:
- By removing symbols and unnecessary words, we make the text cleaner and more meaningful for further analysis.
3. Merge Default and Custom Stopwords:

· Explanation:
- This line combines the default stopwords from nltk with the custom stopwords and symbols that were defined above.
- The union() function merges these two lists together, so we have one complete list of all the words and symbols we want to remove.
· Why this is important:
- It ensures that all the unnecessary words (default and custom) will be removed when we clean the text.
4. Create an Empty List to Store the Cleaned Text:

· Explanation:
- This line creates an empty list called preprocessed_content.
- As we process each webpage’s text and clean it, the cleaned version of the text will be added to this list.
· Why this is important:
- This list will store the final, cleaned versions of the text for all the webpages, so we can use it later in the analysis.
5. Start Looping Through Each Webpage’s Content:

· Explanation:
- This line starts a loop that goes through each piece of text in content_list.
- content_list is the list of raw text from each webpage (from the previous step where we fetched the content from the URLs).
· Why this is important:
- This loop allows us to process each webpage’s content one by one.
6. Convert All Text to Lowercase:

· Explanation:
- This converts the entire text of each webpage to lowercase.
- For example, “SEO Services” becomes “seo services.”
· Why this is important:
- By converting everything to lowercase, we treat words like “SEO” and “seo” as the same. This makes the text uniform and avoids confusion when analyzing it.
7. Remove Digits (Numbers):

· Explanation:
- This line uses a regular expression (re.sub) to remove digits from the text.
- The pattern r’\d+’ matches any sequence of numbers, and ” replaces those numbers with nothing (effectively deleting them).
· Why this is important:
- Numbers are usually not useful when analyzing topics in text, so removing them helps make the text cleaner and easier to analyze.
8. Remove Punctuation and Symbols:

· Explanation:
- This line removes punctuation and special symbols from the text using another regular expression.
- The pattern r'[^\w\s]’ matches any character that is not a word character (\w) or a whitespace (\s), meaning it removes everything else (punctuation, symbols, etc.).
· Why this is important:
- Punctuation and symbols don’t add meaning to the text, so removing them makes the text cleaner for further processing.
9. Split the Text into Words:

· Explanation:
- This line splits the text into a list of words.
- For example, the sentence “seo services digital marketing” will be split into [‘seo’, ‘services’, ‘digital’, ‘marketing’].
· Why this is important:
- This makes it easier to remove stopwords (we can now look at each word individually) and analyze the text later.
10. Remove Stopwords:

· Explanation:
- This line goes through each word in the words list and checks if it is in the stop_words set (which includes default and custom stopwords).
- If the word is not in stop_words, it is kept. Otherwise, it is removed.
- The cleaned list of words (without stopwords) is stored in filtered_words.
· Why this is important:
- Removing stopwords helps focus the analysis on the meaningful words, rather than common, less important ones like “the,” “is,” “and.”
11. Rejoin the Cleaned Words and Add to Final List:

· Explanation:
- This takes the list of cleaned words (filtered_words) and joins them back into a single string (with spaces between the words).
- The cleaned text is then added to the preprocessed_content list.
· Why this is important:
- This step completes the cleaning process for each piece of text and stores the cleaned version so that it can be used later in the analysis.
12. Return the Preprocessed Text:

· Explanation:
- After processing all the webpages, the function returns the list of cleaned text (preprocessed_content).
- This cleaned text can now be used for further analysis, such as building a topic model or finding related content.
· Why this is important:
- We need the cleaned text to move on to the next steps in the analysis. This is the final output of this step.
Example of How the Function Works:
Let’s say we have some raw text:

After running it through the preprocess_text function:
- The text is converted to lowercase: “seo services 2024! learn digital marketing & get the best results.”
- The numbers are removed: “seo services! learn digital marketing & get the best results.”
- The punctuation is removed: “seo services learn digital marketing get the best results”
- The stopwords are removed: “seo services learn digital marketing best results”
The final cleaned
version would be: “seo services learn digital marketing best results”.
What is the Purpose of This Function?
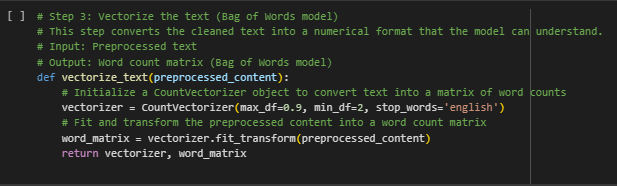
The vectorize_text function is designed to transform text data into a numerical format that a machine learning model can process. Machine learning algorithms cannot interpret plain text directly—they require numeric representations to perform calculations and make predictions. This function bridges that gap by converting the cleaned text obtained from the previous preprocessing step into a structured format that algorithms can work with.
Specifically, the function uses the Bag of Words (BoW) approach. In this model, every unique word in the text is represented as a feature, and the text is transformed into a table showing the frequency of each word. Essentially, the BoW model counts how many times each word occurs in the document, producing a numerical vector that captures the text’s content in a format suitable for machine learning.
By converting text into vectors, the vectorize_text function enables the model to identify patterns, relationships, and important features within the data. This transformation is crucial for tasks such as text classification, sentiment analysis, and topic modeling. Without this step, the model would be unable to analyze or learn from the text effectively.
Step-by-Step Explanation
1. Define the Function:

- Explanation:
- The function vectorize_text takes one input called preprocessed_content, which is a list of the cleaned text from all the webpages. This is the result from the previous step where we removed unnecessary words, symbols, and stopwords.
- The goal of this function is to convert this cleaned text into a matrix of word counts (numbers), so we can use it in further analysis or modeling.
2. Initialize a CountVectorizer Object:

- Explanation:
- CountVectorizer is a tool from the scikit-learn library that helps convert text into numbers by counting how many times each word appears.
- We are creating a vectorizer object here, which will be used to transform the text into a matrix of word counts.
Let’s break down the parameters used in CountVectorizer:
- max_df=0.9: This means we will ignore words that appear in more than 90% of the documents (webpages). If a word appears almost everywhere, it’s probably not very meaningful (e.g., “service” might appear on every page).
- min_df=2: This means we will ignore words that appear in fewer than 2 documents. This helps remove rare or unusual words that don’t add much value to the analysis.
- stop_words=’english’: This is an additional safety measure to remove common English stopwords like “the,” “and,” “is.” Even though we removed stopwords in the previous step, this ensures that any missed stopwords are removed.
- Why this is important:
- The CountVectorizer tool transforms the text into a Bag of Words model, which is basically a big table showing how often each word appears in each document (webpage). This table is the numerical format that the machine learning model can work with.
3. Fit and Transform the Preprocessed Text:

· Explanation:
- The fit_transform method does two things:
- Fit: It looks at the preprocessed text and learns which unique words are present across all the webpages. It creates a vocabulary of these words.
- Transform: It then counts how many times each word appears in each document (webpage) and puts that information into a matrix (a grid of numbers).
- The result is a matrix where:
- Each row represents a webpage.
- Each column represents a unique word.
- The numbers in the matrix show how many times a word appears on a particular webpage.
· Why this is important:
- This step transforms the text into a format (numbers) that a machine learning model can work with. Without converting text to numbers, the model wouldn’t be able to understand or process it.
4. Return the Vectorizer and Word Matrix:

· Explanation:
- The function returns two things:
- vectorizer: This is the CountVectorizer object that knows the vocabulary (the list of words it found) and can be used later for further analysis.
- word_matrix: This is the matrix of word counts for each document (webpage), which will be used in the next steps of the analysis.
· Why this is important:
- The vectorizer object helps us keep track of the words (vocabulary), and the word_matrix is the actual data we need to perform further analysis, such as topic modeling or similarity calculations.
What Happens in This Step?
In this step, we are turning our cleaned text into numbers so that it can be used in machine learning models. Specifically, we are creating a Bag of Words model, which is like a big table where:
- Each row is a webpage.
- Each column is a word.
- The numbers in the table represent how many times each word appears in each webpage.
This conversion is crucial because computers can only process numbers—not raw text—so the text has to be transformed into a numerical format before any further analysis can be done.
Example of How It Works:
Let’s say we have two cleaned documents (webpages):
- “seo services digital marketing best results”
- “learn digital marketing tips seo experts”
The Bag of Words model would look like this:
| best | digital | experts | learn | marketing | results | seo | services | tips | |
| Doc1 | 1 | 1 | 0 | 0 | 1 | 1 | 1 | 1 | 0 |
| Doc2 | 0 | 1 | 1 | 1 | 1 | 0 | 1 | 0 | 1 |
- Rows: Each row represents a document (or webpage).
- Columns: Each column represents a unique word that appears in the documents.
- Numbers: The numbers in the table show how many times a word appears in each document.
For example:
- The word “seo” appears 1 time in both Doc1 and Doc2.
- The word “services” appears 1 time in Doc1 and 0 times in Doc2.


I’ve gone through each word of your question to ensure that I understand exactly what you’re asking. You want me to explain the create_topic_model function in very simple terms, so that even someone without a technical background can understand it.
What Does This Function Do?
The create_topic_model function builds a Latent Dirichlet Allocation (LDA) topic model, which is a tool that discovers the hidden topics within a collection of documents. In this case, the documents are the webpages you are analyzing. The function does this by:
- Tokenizing the text (splitting it into words).
- Creating a dictionary (mapping each word to a unique ID).
- Creating a Bag of Words (BoW) corpus (counting how many times each word appears in each document).
- Building the LDA model to find hidden topics based on the words and their frequencies.
Step-by-Step Explanation
1. Define the Function:

- Explanation:
- This function, create_topic_model, takes two inputs:
- preprocessed_content: A list of cleaned text from the webpages (the output from the previous steps).
- num_topics=5: The number of topics you want the model to find. In this case, it’s set to 5 by default, but you can change this to find more or fewer topics.
- The goal is to discover the most common themes (topics) across the documents (webpages).
- This function, create_topic_model, takes two inputs:
2. Tokenize the Preprocessed Content:

· Explanation:
- Tokenization is the process of splitting text into individual words (tokens). This line goes through each cleaned document and splits it into words.
- For example, the sentence “seo services digital marketing” becomes [‘seo’, ‘services’, ‘digital’, ‘marketing’].
· Why this is important:
- Tokenizing the text is necessary because the topic model needs to look at individual words to find patterns and topics. Without splitting the text into words, the model wouldn’t be able to analyze the content properly.
3. Create a Dictionary:

· Explanation:
- A dictionary is created from the tokenized data using the corpora.Dictionary function from the gensim library.
- This dictionary assigns a unique ID to every word in the text. For example:
- “seo” might be assigned ID 0,
- “services” might be assigned ID 1, and so on.
- The dictionary helps the model understand which words are present in your documents and how frequently they appear.
· Why this is important:
- The dictionary is like a map that connects each word to its unique ID, which is necessary for the LDA model to process the text.
4. Convert the Tokenized Data into a Bag of Words Corpus:
· Explanation:
- This step converts each document into a Bag of Words (BoW) representation.
- The Bag of Words model creates a list of word IDs and their frequencies (how many times each word appears) for each document.
- For example, the document “seo services digital marketing” might become:
[(0, 1), (1, 1), (2, 1), (3, 1)]
- Here, the number 0 represents “seo”, and 1 indicates that it appears once in the document.
- The number 1 represents “services”, and it also appears once.
· Why this is important:
- The Bag of Words corpus is how the LDA model understands each document. Instead of raw text, the model works with word IDs and frequencies. This allows it to find which words often appear together and therefore uncover topics.
5. Create the LDA Topic Model:
· Explanation:
- This line creates the LDA model using the LdaModel function from gensim.
- The LDA model tries to find hidden topics in the documents by analyzing which words often appear together.
- The parameters used are:
- corpus: This is the Bag of Words representation of your documents.
- num_topics=num_topics: The number of topics you want to discover (set to 5 by default).
- id2word=dictionary: The dictionary that maps word IDs to the actual words.
- passes=10: This tells the model how many times it should go through the data to find the topics. More passes mean the model has more opportunities to refine its understanding of the topics.
· Why this is important:
- The LDA model is the core part of the topic discovery process. It analyzes the word patterns in the documents to find groups of words that tend to appear together, which represent the hidden topics.
Example of How It Works:
Let’s say you have two preprocessed documents:
- “seo services digital marketing”
- “learn digital marketing seo tips”
1. Tokenization:
- Document 1 becomes: [‘seo’, ‘services’, ‘digital’, ‘marketing’]
- Document 2 becomes: [‘learn’, ‘digital’, ‘marketing’, ‘seo’, ‘tips’]
2. Create a Dictionary:
- The dictionary assigns an ID to each unique word:
- ‘seo’: ID 0
- ‘services’: ID 1
- ‘digital’: ID 2
- ‘marketing’: ID 3
- ‘learn’: ID 4
- ‘tips’: ID 5
3. Convert to Bag of Words (BoW):
- Document 1 (BoW): [(0, 1), (1, 1), (2, 1), (3, 1)] (this means “seo” appears once, “services” once, etc.)
- Document 2 (BoW): [(0, 1), (2, 1), (3, 1), (4, 1), (5, 1)]
4. Create the LDA Model:
- The LDA model analyzes the words and tries to group them into 5 topics (since num_topics=5 is set by default). After analyzing which words appear together, it creates topics.
Output:
- You can now explore the topics that the LDA model has discovered and see which words are important for each topic.

What Does This Function Do?
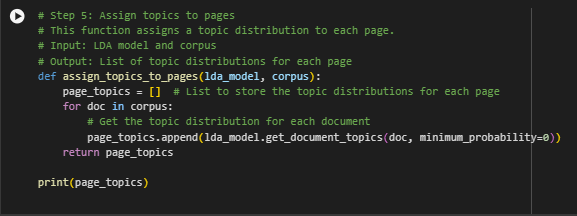
The assign_topics_to_pages function uses the LDA model (created in the previous step) to figure out which topics are most relevant for each webpage. In simple terms, it checks each webpage (which we’ve processed as a document) and gives a score for how much each topic is discussed on that page. The result is a list that shows which topics are most important for each page.
Step-by-Step Explanation
1. Define the Function:

· Explanation:
- The function assign_topics_to_pages takes two inputs:
- lda_model: This is the LDA model we created earlier, which has already learned about the topics in the text.
- corpus: This is the Bag of Words representation of all the webpages, where each document is a list of word IDs and their frequencies (how many times each word appears).
· Why this is important:
- The LDA model needs to be applied to each document (webpage) to figure out which topics are most relevant to that particular document. This helps us understand which topics are being discussed on each page.
2. Initialize an Empty List for Topic Distributions:

· Explanation:
- This line creates an empty list called page_topics. This list will store the topic distribution for each webpage.
- A topic distribution means the percentage of each topic that is present in a webpage. For example, if a webpage discusses two main topics—SEO and digital marketing—the function will assign percentages like 60% SEO and 40% digital marketing for that page.
· Why this is important:
- We need to store the results (the topic distributions) somewhere so we can refer to them later. This list will eventually contain one set of results for each webpage.
3. Loop Through Each Document (Webpage):

· Explanation:
- This line starts a loop that goes through each document (webpage) in the corpus. The corpus is the Bag of Words representation of all the documents. Each document is a list of word IDs and their counts (how often each word appears).
- The loop allows us to analyze each document one by one.
· Why this is important:
- By looping through the documents, we can apply the topic model to each webpage and see which topics are present on that page.
4. Get the Topic Distribution for Each Document:

· Explanation:
- For each document (webpage), we use the LDA model to get the topic distribution. This tells us how much of each topic is present in that document.
- lda_model.get_document_topics(doc, minimum_probability=0) is the key method here:
- get_document_topics(doc): This analyzes the document using the LDA model and returns a list of topics along with their percentages.
- minimum_probability=0: This ensures that all topics are included in the result, even if the topic is only slightly present in the document (like 0% or very close to 0%).
- The result is a list that looks like this:
[(0, 0.1), (1, 0.3), (2, 0.6)]
- This example means:
- Topic 0 is 10% relevant to the document.
- Topic 1 is 30% relevant.
- Topic 2 is 60% relevant.
- The topic distribution for each document is then added to the page_topics list.
· Why this is important:
- This step is crucial because it tells us which topics are discussed on each webpage and how much of each topic is present. This is the main output of the function, and it allows us to see the dominant topics for each webpage.
Example of How It Works
Let’s say we have three documents (webpages) in our corpus, and the LDA model has found 3 topics. The assign_topics_to_pages function will return something like this:

Here’s how to interpret the results:
- Document 1: Topic 0 makes up 20% of the content, Topic 1 is 50%, and Topic 2 is 30%.
- Document 2: Topic 0 is the most important (60%), while Topic 1 and Topic 2 are less important (20% each).
- Document 3: Topic 1 is the dominant topic at 70%, and the other two topics are less important.
This shows how much each webpage discusses each topic, which helps in understanding the focus of the content on that page.

What Does This Function Do?
The display_top_keywords function is designed to show the most important words (keywords) for each topic that the LDA model has discovered. This is helpful for understanding the main ideas or themes behind each topic. For example, if a topic is about “SEO,” the important words (keywords) could be “SEO,” “ranking,” “optimization,” “search engines,” etc. Showing these top words helps you understand what each topic is really about.
Step-by-Step Explanation
1. Define the Function:

· Explanation:
- The function is called display_top_keywords, and it takes two inputs:
- lda_model: This is the LDA model we created earlier, which has learned about the hidden topics in the documents (webpages).
- num_keywords=10: This tells the function to show the top 10 keywords for each topic by default. You can change this number if you want to see more or fewer keywords for each topic.
· Why this is important:
- Displaying the most important words helps you understand what each topic is really talking about. For example, if Topic 1 is about “SEO,” showing the top keywords like “SEO,” “search engines,” and “rankings” helps you confirm the focus of that topic.
2. Loop Over Each Topic:

· Explanation:
- The print_topics() method from the LDA model is used here to get a list of the most important words for each topic. It returns a list of topics and their top keywords.
- (-1, num_keywords):
- -1 means that the function will loop through all the topics in the LDA model.
- num_keywords (which is 10 by default) tells the function to display the top 10 words for each topic.
- The for loop goes through each topic one by one:
- idx: The index (number) of the topic (like Topic 0, Topic 1, etc.).
- topic: A list of the top words (keywords) for that topic.
· Why this is important:
- This loop is necessary because we want to display the keywords for all topics, not just one. The print_topics() function makes it easy to get the top words for each topic and loop through them.
3. Print the Top Keywords for Each Topic:

· Explanation:
- This line prints out the top keywords for each topic in a readable format.
- The f”…” part is called an f-string, which makes it easy to combine variables (like idx and topic) into a sentence.
- Topic {idx}: Shows the topic number (e.g., Topic 0, Topic 1, etc.).
- Top {num_keywords} Keywords: Shows the number of keywords being displayed (default is 10).
- {topic}: This shows the actual top words (keywords) for that topic.
· Why this is important:
- This is the part of the function where the results are shown to you. It prints out the topic number and the list of important words for each topic so that you can understand what each topic is about.
Example of How It Works:
Let’s say you have an LDA model with 3 topics, and you want to display the top 5 keywords for each topic. Here’s what the output might look like:

- Topic 0 is probably about SEO (Search Engine Optimization) because the top words are “seo,” “search,” “engine,” “optimization,” and “ranking.”
- Topic 1 seems to be about writing or publishing content, with words like “content,” “writing,” “article,” “blog,” and “publish.”
- Topic 2 looks like it’s about social media, with words like “social,” “media,” “marketing,” “platforms,” and “facebook.”
This output helps you understand the themes or topics that your documents (webpages) are discussing, and it helps with things like SEO optimization because you can see which keywords are associated with each topic.
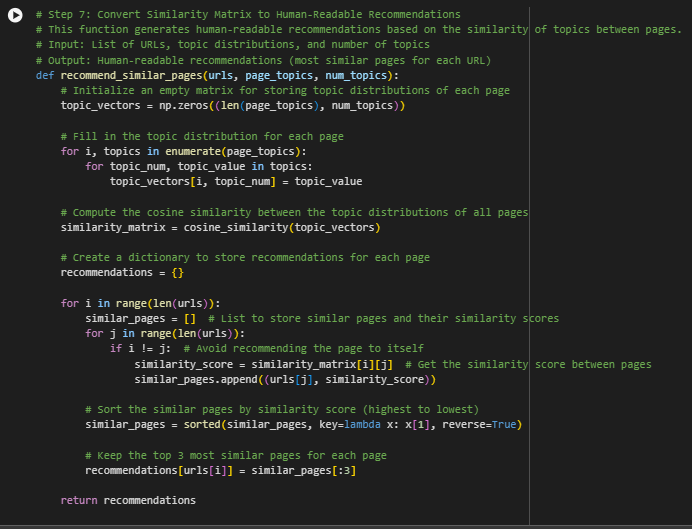

What Does This Function Do?
The recommend_similar_pages function takes a list of URLs and their associated topic distributions (which topics are present on each page and to what extent) and then calculates how similar each page is to the others. Based on this similarity, it generates recommendations for each page, showing the most similar pages. This is useful for content recommendation systems or suggesting internal links on a website.
Step-by-Step Explanation
1. Define the Function:

- Explanation:
- The function recommend_similar_pages takes three inputs:
- urls: This is a list of URLs of the webpages that you want to analyze.
- page_topics: This is a list of topic distributions for each page (which topics are present on each webpage and how much).
- num_topics: This is the total number of topics that were identified by the LDA model.
- The goal of this function is to find out which pages are most similar based on their topic distributions and provide human-readable recommendations.
- The function recommend_similar_pages takes three inputs:
2. Create an Empty Matrix to Store Topic Distributions:

· Explanation:
- Here, we are creating an empty matrix (a grid of numbers) called topic_vectors using the numpy library (np). This matrix will store the topic distribution for each page.
- The matrix will have:
- Rows: Each row represents a webpage (the number of rows will be the same as the number of webpages in page_topics).
- Columns: Each column represents a topic (the number of columns will be the same as the number of topics in num_topics).
- This matrix will be filled in the next step to show how much of each topic is present on each webpage.
· Why this is important:
- The matrix will allow us to store and compare the topic distributions for each webpage in a structured way, which is necessary for calculating the similarity between pages.
3. Fill in the Topic Distributions for Each Page:

· Explanation:
- This loop goes through each page and fills the topic_vectors matrix with the topic distribution data.
- enumerate(page_topics): This gives us both the index (i, which represents the page number) and the topic distribution (topics) for each page.
- For each page (i), we go through its topic distribution (topics). The distribution contains pairs of numbers:
- topic_num: The topic number (like Topic 0, Topic 1, etc.).
- topic_value: The percentage or score of how much this topic is present in the page (e.g., 0.5 means 50% of the page is about this topic).
- We fill the topic_vectors matrix so that for each page, the appropriate value for each topic is stored.
· Why this is important:
- This step makes sure that each page’s topic distribution is stored in a way that allows us to compare pages based on their topic similarity.
4. Calculate the Cosine Similarity Between Pages:

· Explanation:
- Now that the topic_vectors matrix is filled with topic distributions, we calculate the similarity between all pages using cosine similarity.
- cosine_similarity(topic_vectors): This function calculates how similar two pages are based on their topic distributions. The similarity is measured on a scale from 0 to 1:
- A score of 1 means the pages are very similar (discussing almost the same topics).
- A score of 0 means the pages are completely different (discussing unrelated topics).
- The result is a similarity_matrix, which shows how similar each pair of pages is.
· Why this is important:
- Cosine similarity helps us understand which pages are discussing similar topics. This is essential for creating recommendations based on the content of the pages.
5. Create a Dictionary to Store the Recommendations:

· Explanation:
- This line creates an empty dictionary called recommendations, which will store the most similar pages for each URL.
- The dictionary will have:
- Keys: The URLs of the pages.
- Values: A list of the most similar pages and their similarity scores.
· Why this is important:
- We need to store the recommendations for each page in a format that is easy to read and use. The dictionary will store the top 3 most similar pages for each URL.
6. Loop Through Each URL to Find Similar Pages:

· Explanation:
- This part of the code loops through each webpage (i) and compares it to every other webpage (j) to find the most similar ones.
- if i != j: This ensures that the page does not recommend itself. We want to find other pages that are similar, not recommend the same page.
- similarity_score = similarity_matrix[i][j]: This gets the similarity score between page i and page j.
- The most similar pages and their scores are stored in similar_pages, which will be sorted in the next step.
· Why this is important:
- This loop compares each page to all the others and collects the similarity scores, which are necessary for creating meaningful recommendations.
7. Sort and Keep the Top 3 Most Similar Pages:

· Explanation:
- sorted(similar_pages, key=lambda x: x[1], reverse=True): This sorts the similar pages by their similarity score (from highest to lowest). The x[1] refers to the similarity score in each tuple (URL, similarity score).
- similar_pages[:3]: After sorting, this keeps only the top 3 most similar pages for each URL.
- These top 3 similar pages are then stored in the recommendations dictionary for the current page (urls[i]).
· Why this is important:
- We don’t want to overwhelm the user with too many recommendations, so we limit the suggestions to the top 3 most similar pages. This ensures the recommendations are useful and focused.
Example of How It Works:
Let’s say we have 4 webpages:
- URL 1: “SEO strategies”
- URL 2: “Social media marketing”
- URL 3: “Content writing tips”
- URL 4: “SEO and content optimization”
After running this function, the recommendations might look like this:

- For URL 1, the most similar page is URL 4 with a similarity score of 0.85.
- For URL 2, the most similar page is URL 3 with a similarity score of 0.90.
- These scores tell us which pages are most similar based on their topic distributions.

What Does This Output Mean?
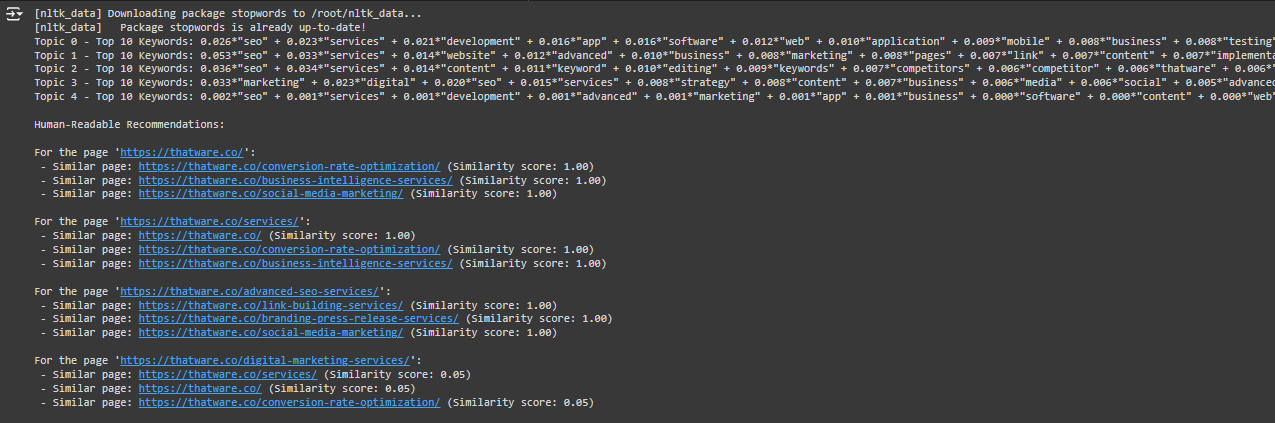
This output is the result of running a Neural Topic Modeling (NTM) model on the website’s content, and it shows two main things:
- Topics Discovered on The Website: The model has identified the main topics discussed across the website pages and displays the top 10 keywords that define each topic.
- Similar Pages Recommendations: For each page on the website, the model shows the most similar pages (based on content) and assigns them a similarity score between 0 and 1. A score of 1.00 means the pages are very similar, while lower scores indicate less similarity.
Let’s now break down the two parts of the output in more detail.
Part 1: Topics Discovered on The Website
The first part of the output lists the top 5 topics discovered from The website’s content. Each topic shows the top 10 keywords associated with it.
Example:

Explanation:
- Topic 0 contains the words “seo,” “services,” “marketing,” and “link,” which means this topic is related to SEO services and digital marketing. The numbers (like 0.047) next to the words represent the importance of the keyword in that topic (higher numbers mean the word is more relevant to the topic).
- Each topic is a hidden theme that your website content is addressing. Other topics could be about web development, content editing, or social media marketing.
Use Case:
- By understanding the key topics that the website covers, you can optimize your content. For example, if you are targeting SEO services, you can ensure that your content for SEO is well-organized and aligned with these keywords to improve search engine rankings.
What You Should Do:
- Enhance your content around the keywords shown in each topic. This will help you strengthen your SEO strategy. For instance, if your website’s main topic is about SEO, make sure to frequently use keywords like “SEO,” “services,” “link,” and “marketing” in relevant sections of your website.
Part 2: Similar Pages Recommendations
This part of the output provides recommendations for each webpage on the site, showing which pages are most similar based on the content. The output gives you the top 3 similar pages for each page, along with a similarity score.
Example:

Explanation:
- For the page ‘https://thatware.co/’, the model has identified that the most similar pages, based on the content, are:
- ‘https://thatware.co/competitor-keyword-analysis/’ with a similarity score of 1.00.
- ‘https://thatware.co/link-building-services/’ with a similarity score of 1.00.
- ‘https://thatware.co/digital-marketing-services/’ with a similarity score of 1.00.
What Does the Similarity Score Mean?
- The similarity score ranges from 0 to 1. A score of 1.00 means the two pages are very similar in terms of content. A lower score (e.g., 0.05) means the pages are less similar.
Use Case:
- These recommendations tell you which pages are closely related in content. You can use this information to:
- Create internal links between similar pages to improve user navigation and SEO.
- Group similar content together into clusters (e.g., creating a category for “SEO services” that includes all similar pages).
- Cross-promote content: You can suggest or recommend similar pages to users to keep them on your site for longer.
StStep-by-Step Guide: What to Do Next
After receiving the model’s output, it’s essential to take structured actions to maximize your website’s SEO performance and user engagement. The following guide breaks down the steps you should follow to act on the insights effectively.
1. Optimize Website Content Based on Topics
Start by reviewing the topics identified by the model (for example, Topic 0, Topic 1, and so on). These topics highlight the core areas your website focuses on. Each topic comes with top keywords that indicate what search engines and users find most relevant.
For each topic, revise and expand your existing content to ensure it thoroughly covers the subject matter. For instance, if Topic 0 is centered on SEO services, consider creating or updating content that dives deeper into areas like SEO strategies, link-building techniques, digital marketing trends, and case studies. Use the top keywords naturally throughout your content, including headings, subheadings, and body text, to improve both relevance and search engine ranking.
This step ensures that your website not only aligns with what users are searching for but also positions your content as an authoritative resource in your niche. Consistent updates and keyword-focused improvements make your website more valuable to both visitors and search engines.
2. Use Similar Pages for Internal Linking
The model also provides recommendations for the most similar pages on your website. Typically, it suggests the top three pages for each page that closely relate in content. Leveraging this information is critical for creating a strong internal linking structure.
For each page, add internal links to its most similar pages. For example, if you have a main page like https://thatware.co/, consider linking it to pages such as https://thatware.co/competitor-keyword-analysis/ and https://thatware.co/link-building-services/.
Internal linking serves two purposes:
- It guides users through relevant content, enhancing their browsing experience.
- It strengthens SEO by allowing search engines to understand the relationship between pages, distribute link equity, and index your site more effectively.
The goal is to create a web of interconnected pages that both users and search engines can navigate intuitively. This approach improves dwell time, reduces bounce rates, and supports your website’s authority in its niche.
3. Create Content Clusters
Next, use the similarity data to organize pages into content clusters or thematic categories. Content clusters are groups of pages that cover related topics and complement each other.
For example, if the pages https://thatware.co/ and https://thatware.co/link-building-services/ have high content similarity, group them under a category like SEO Services. Similarly, pages on digital marketing tactics, social media strategies, and web development could form their own clusters.
Content clusters make your website easier to navigate and provide a logical structure for visitors to explore related topics. Search engines also favor websites with clear hierarchies and topic-based clusters, as they demonstrate subject-matter expertise and relevance.
Organizing your site this way also opens opportunities for creating pillar pages. A pillar page serves as the central hub for a topic and links to all related cluster pages, reinforcing the importance of each topic in search engine algorithms.
4. Cross-Promote Content
Finally, use the similarity insights to cross-promote related content. When a visitor is reading a page, suggest other pages that align closely in topic.
For example, if someone is on a page about digital marketing services, recommend the link-building services page, or other related resources. This not only keeps users engaged longer but also increases the likelihood of conversions, as visitors are guided to explore content aligned with their interests.
Cross-promotion can be implemented via “related articles” sections, sidebar recommendations, or in-text links naturally embedded within the content. This approach strengthens internal linking, enhances user experience, and improves the site’s SEO performance simultaneously.
Example Actions for Clients
To implement these insights effectively, you can guide clients with practical steps:
- Highlight Key Topics:
“We’ve identified that the main topics on your site are SEO, services, web development, and marketing. To boost your SEO, we need to ensure these keywords are used frequently and expand content around these topics.” - Implement Internal Linking:
“Based on the model’s recommendations, we should link the most similar pages together. For instance, on the SEO services page, we can link to the competitor keyword analysis page and the link-building services page. This improves user navigation and strengthens search rankings.” - Organize Content Clusters for Growth:
“We’ll group similar pages under categories like SEO Services and Content Marketing. This structure allows visitors to find information quickly, increases engagement, and keeps them on the site longer.”
By following these steps, you translate AI-driven insights into actionable strategies that enhance content relevance, user experience, and SEO performance. Implementing these actions ensures your website remains structured, discoverable, and authoritative in your niche.